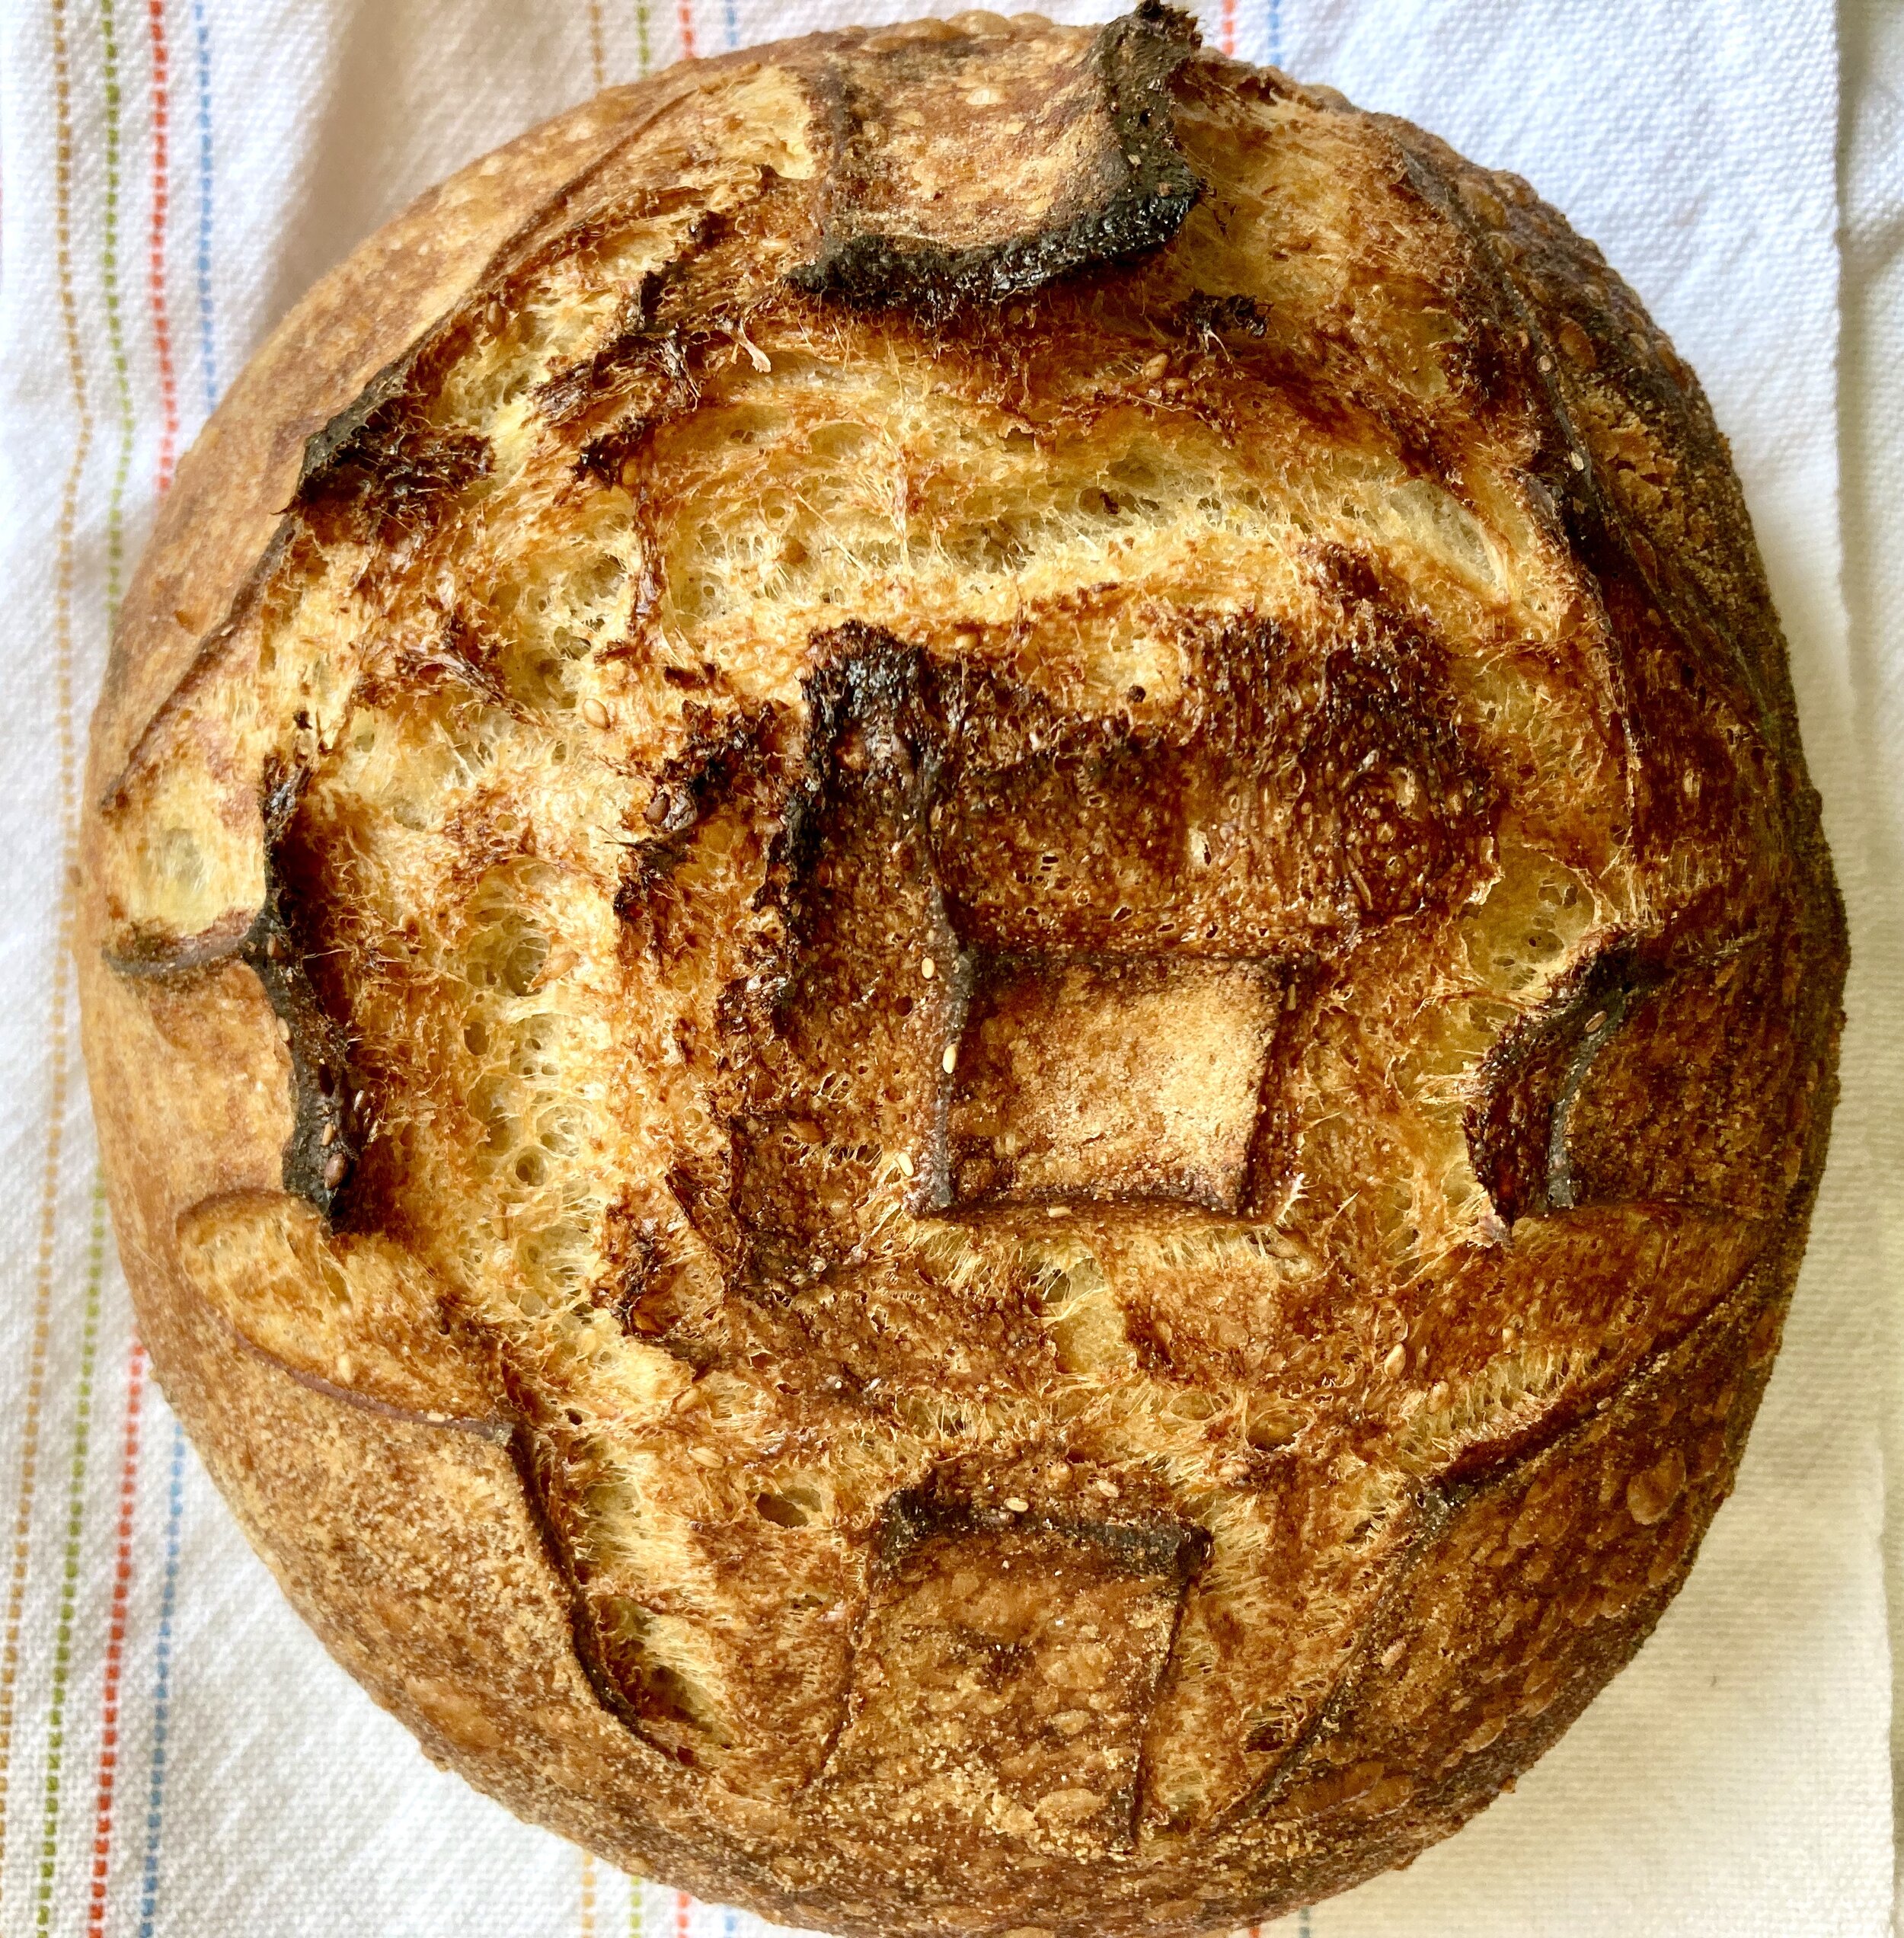
Sesame & Corn Country Loaf
15% cornmeal
10% whole wheat flour
75% bread flour
15% levain
85% water
2.5% sea salt
2.5% toasted sesame seeds
aj
Sesame & Corn Country Loaf
15% cornmeal
10% whole wheat flour
75% bread flour
15% levain
85% water
2.5% sea salt
2.5% toasted sesame seeds
aj

Peddler’s Udon Noodles (a.k.a., Japanese-style Dan Dan Noodles) with homemade udon noodles
The Crisp Pilz, Sixpoint Brewery
aj
This is an elegant, truly delicious, and unbelievably simple recipe for a “pantry cake” (a fruit-based, crispy/tender slab cake that doesn’t require any obscure ingredients) that Michelle devised for our friends at Elena and the Remember Skin Contact? cookbook they created this spring as a fundraiser for the Montreal Restaurant Workers Relief Fund after the shutdown went into effect. (Great people! Great cause!)
Imagine a luscious, plum-laden European coffee cake, and you kind of get the gist of this cake and the vision behind it.
fig. a: no imagination necessary—here it is!
Imagine a cake that’s incredibly easy to make and knocks it out of the park every time.
Michelle had berries in mind when she first invented the recipe, because it was April, berries were due to begin arriving on the scene by June and early July, and the thought of making this cake with blueberries or blackberries seemed like a natural. But she wanted a recipe that would accommodate other fruit options as well, and one of the variations that she was most interested in trying was with plums. Why plums? Well, we love plums, we love plum desserts and plum dishes, and we often find ourselves dreaming of plums—sugar plums, and otherwise. I mean, we did name our preserves line Švestka, after all.

fig. b: early branding
What we didn’t know at the time was that while 2020 has been an absolutely lousy year for virtually everything, it turned into a pretty good plum year. We have an old plum tree that had never really produced in the time we’d known it, but that exploded with fruit this summer.
fig. c: bumper crop
And plums at the farm stands, farmers’ markets, and co-ops have been tasty and plentiful. In fact, this latest batch of the plum cake was inspired by these lovely, Italian-style Valor plums that we came across on the weekend. So tiny! So sweet! Plus, they look a lot like the Švestka plum!

fig. d: Valor is my name
So, if Italian plums are in season or available where you live, they’d be perfect for this recipe.
But the genius of this recipe is that it will definitely work like a charm with berries of all kinds, and it could just as easily become a cherry or pear cake (and around here, it has). And if you don’t have any kirsch on hand, you could also use other liquors, like rum or bourbon, depending on the fruit. In other words, it’s an incredibly versatile recipe. Stick to the original “luscious, ____-laden European coffee cake” vision behind the recipe, and you should be in good stead.
We highly, highly recommend the original plum version, though. We’re a little partial, of course, but we both think it’s kind of perfect, and I’m quite sure it’s my favourite variation.
fig. e: Plum Cake, by the slice
Michelle’s Simply Beautiful Plum Cake
batter:
1/2 cup A.P. flour
1/2 cup semolina flour
1 tsp baking powder
1 generous pinch salt
2 eggs
3/4 cup sugar
1 tbsp sour cream
1 tbsp (or more!) kirsch
1/2 cup butter, melted
toppings:
a pint of fresh plums, pitted and halved (both tart and sweet varieties can be used—just adjust accordingly [see below])
a handful of sliced almonds
1 tablespoon sugar (a little more if your plums are extra tart)
Preheat oven to 350º F.
Butter 8” x 8” square cake pan. Lay a piece of parchment paper inside that’s large enough to cover the bottom and the sides of the pan. Butter the parchment paper, too.
Mix dry ingredients in a bowl.
Whisk eggs with sugar until mixture lightens in colour and becomes creamy. Whisk in sour cream until fully blended. Whisk in kirsch until fully incorporated. Whisk in melted butter until mixture is homogeneous. This whole process should take no more than about 3 minutes.
Add dry ingredients, and whisk once more until just smooth.
Pour batter into parchment-lined cake pan.
Place plums, cut-side down, over the surface of the batter. Sprinkle sliced almonds over top. Sprinkle 1 tablespoon of sugar over top almonds and plums.
Place in the oven on the middle rack.
Bake for 30-35 minutes, until a toothpick inserted into the middle of the cake comes out clean.
Place on a cooling rack and allow to cool.
Cut into squares, serve, and enjoy. This cake is perfect on its own with a cup of coffee or tea, or an after-dinner drink. But it’s also excellent with vanilla ice cream, or freshly whipped cream.
It’s simple. It’s beautiful. It’s also delicious. What are you waiting for?
aj
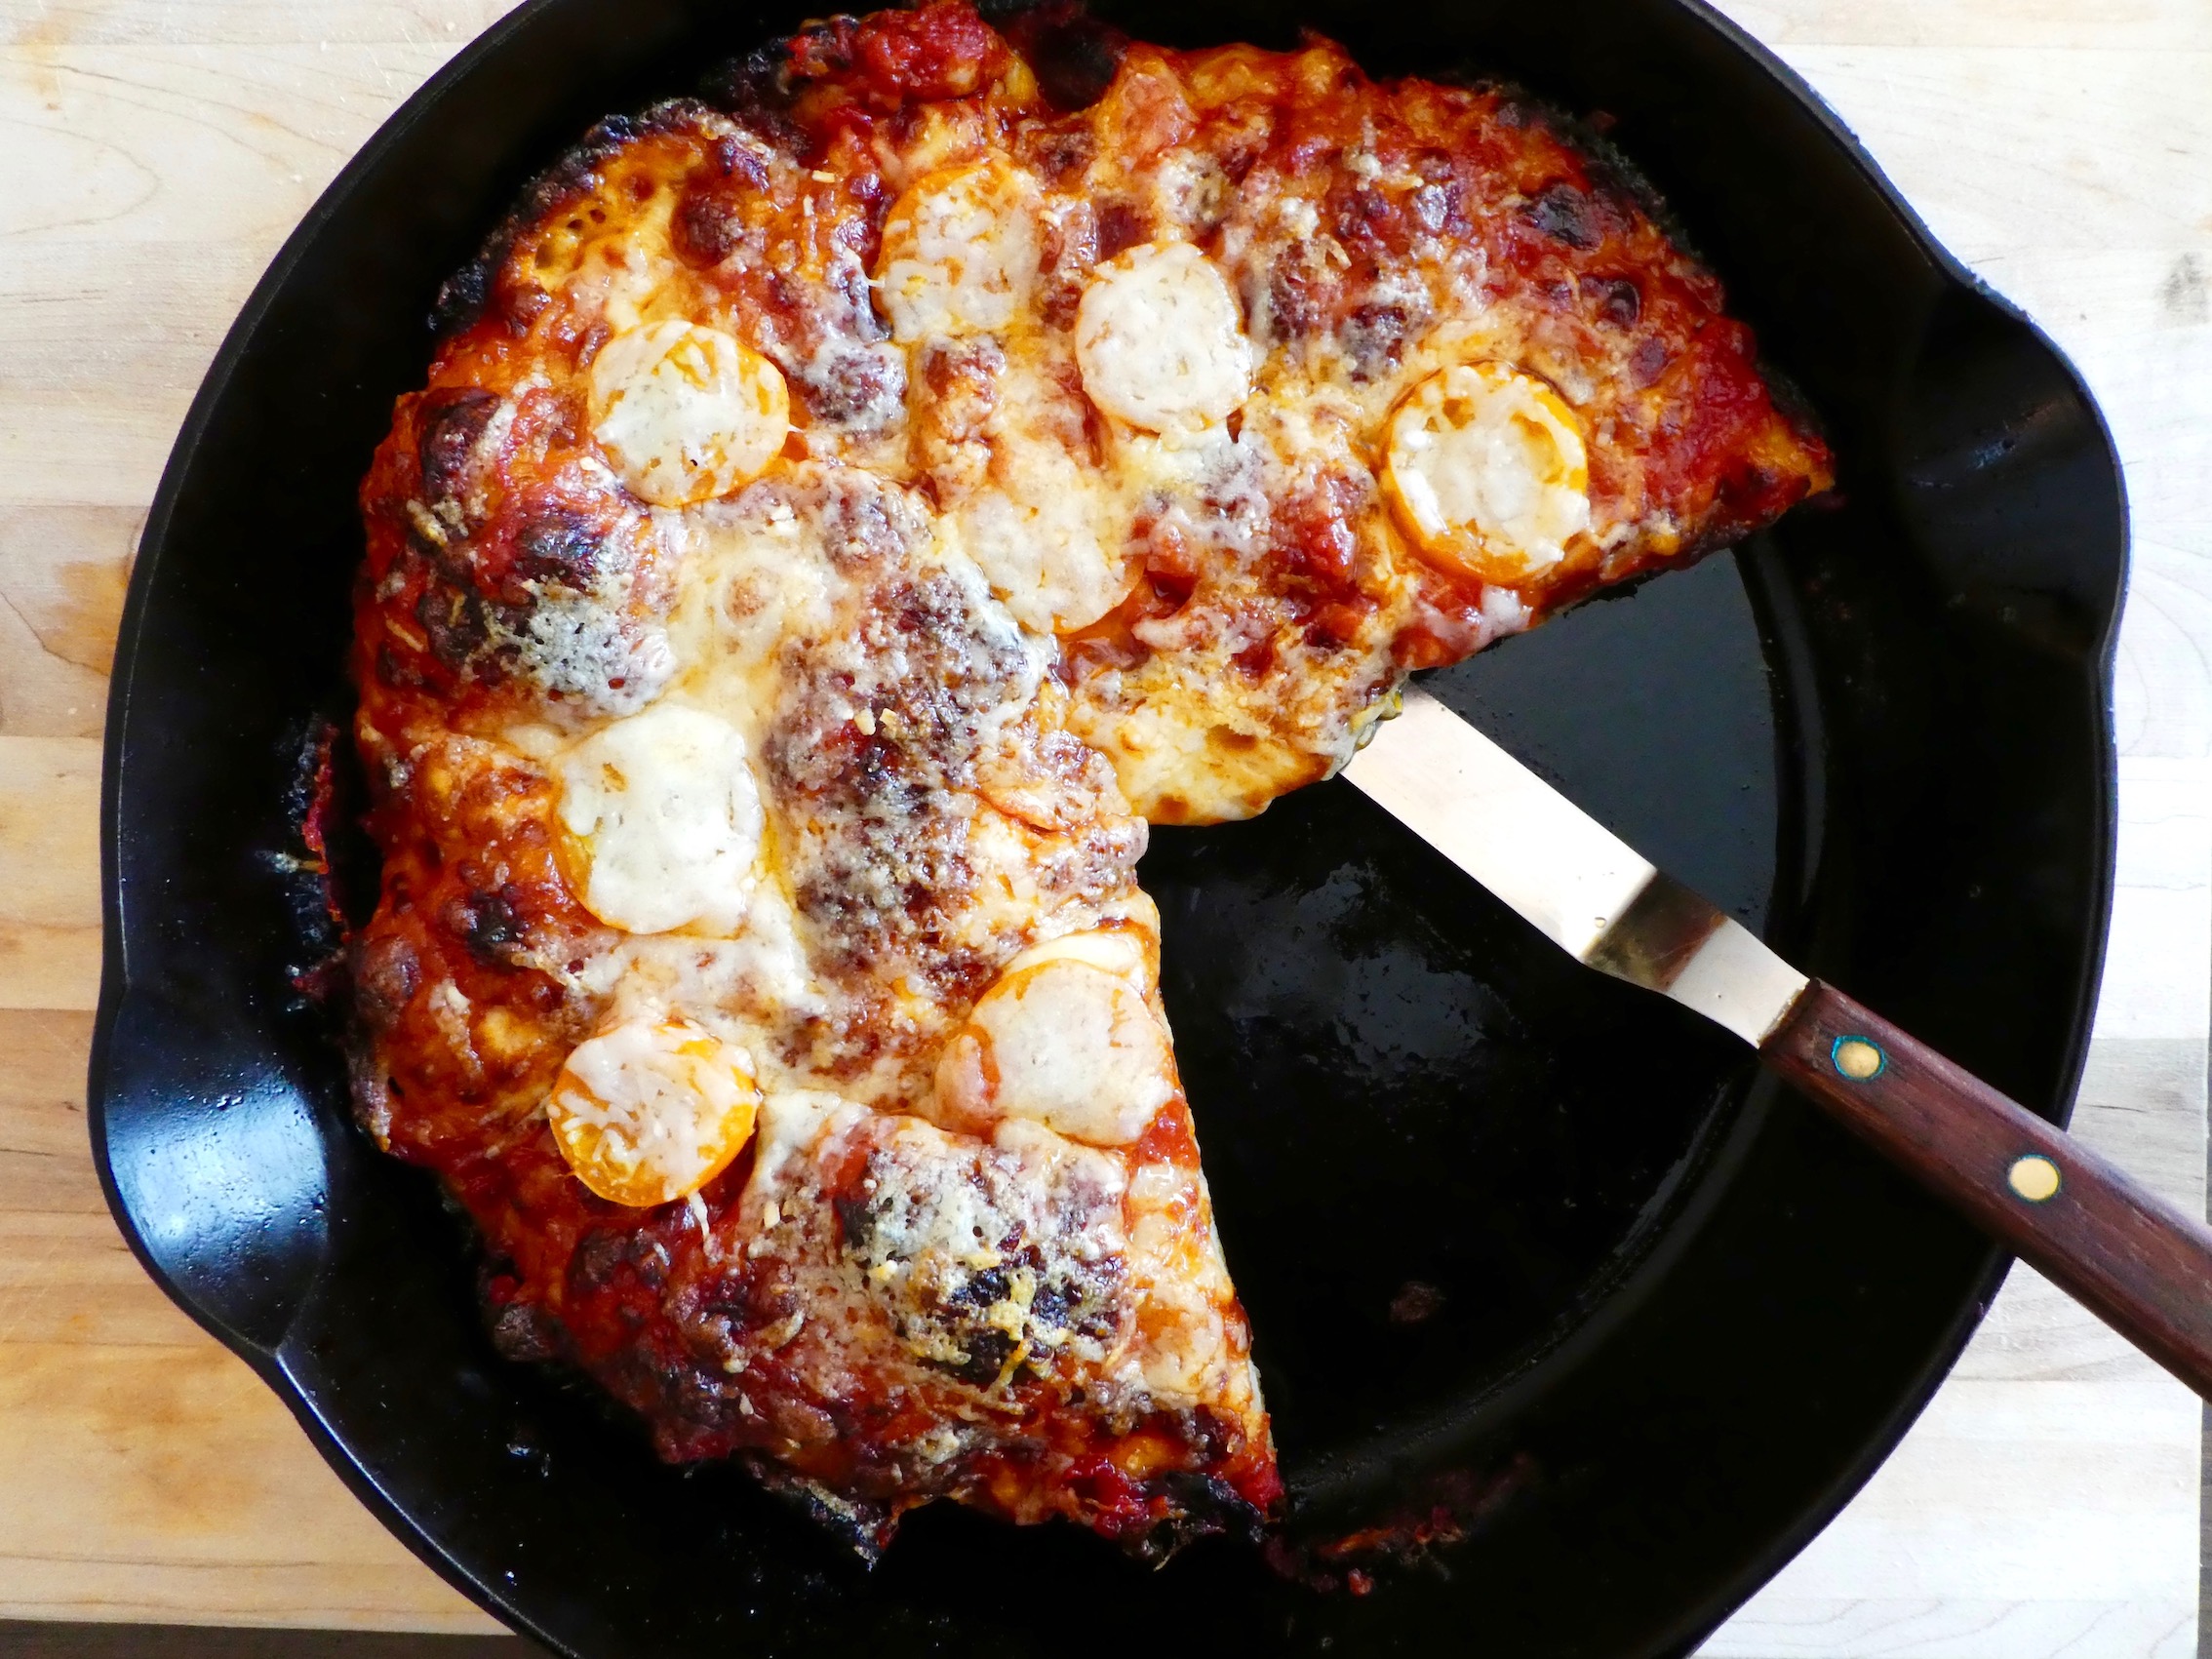
fig. a: The Joy of Pan Pizza
I’m definitely not the first person to point this out, but what we need now are simple, satisfying recipes; recipes that don’t require a bunch of obscure ingredients, but instead feature items that can be easily found at your local supermarket, green grocer, or co-op; recipes that actually turn out well (exceptionally well) and that are rewarding to make.
And if these recipes should have a touch of nostalgia to them, all the better.
Enter pan pizza.
So much of the literature on pan pizza—and, believe me, there is a fairly extensive body of literature on the topic—is dripping with nostalgia. Almost literally so. There’s a real obsession with trying to recreate those buttery, decadent crusts of yore, topped with excessive amounts of gooey cheese, and lots of piping-hot, slightly sweet tomato sauce—the ones that you cherished as a child. The ones you may still cherish today.
While my family definitely ate a considerable amount of pizza, I didn’t grow up in a pan pizza household. I never had that powerful association with Pizza Hut and its ilk that so many others had. I wasn’t entirely averse to the pan pizza thing—its charms were pretty obvious to me—but, for better or for worse, other types of pizza exerted a stronger influence on me.
All of which is to say, that when I got interested in making pizza at home a number of years ago, I gravitated toward other styles: mainly Neapolitan (or rather, Neapolitan-esque), New York-style (or what might more accurately be described as New York-ish), some approximation of Bay Area pizzas we’d admired in the past, and sheet pizzas that mimicked those of Sullivan Street Bakery. Even though I often read about pan pizza with interest, it took me years to actually get around to trying one of these new-school, homemade pan pizza recipes out.
Big mistake.
When I began to experiment with pan pizza a couple of years ago I quickly realized that these were among the very easiest, most consistently excellent, and most satisfying home pizza recipes out there. They didn’t require ingredients that were difficult to find, and you didn’t need a pizzaiolo’s touch or a whole lot of fancy equipment. Hell, you didn’t even need a pizza peel (or some kind of substitute for one), you just needed a 10-inch skillet, preferably cast-iron.

fig. b: Look, Ma, no peel!
My go-to pan pizza recipe is actually a mash-up of two popular recipes that have appeared online in recent years: one from Serious Eats, and the other from The New York Times Magazine.
The dough recipe comes from J. Kenji López-Alt, it’s incredibly easy to make, and, even better, it’s foolproof—or as close to foolproof as a recipe can be. In fact, that’s what it’s called: Foolproof Pan Pizza Recipe. The only investment needed is time. I typically start the process late at night, before I go to bed. This step takes mere minutes. The next morning I form my dough balls. Again, this step takes no more than 10-15 minutes (tops!). And by late afternoon/early evening, my pizza dough is ready to go—the only thing is that you need to allow 2 hours for your dough to temper and come to room temperature. Once your dough has tempered, you’ll find it incredibly easy to handle and stretch. You’ll also find it very much alive. Twenty to twenty-five minutes later, you’ll be pulling piping-hot pan pizza from the oven—quite likely, the lightest, tastiest pan pizza you’ve ever tasted. Sounds do-able, right?
Kenji’s accompanying sauce recipe is perfectly excellent. But even better, in my opinion, is a sweeter, somewhat more decadent sauce developed by Anthony Falco of Roberta’s. It, too, is foolproof—or as close to it as imaginable—and its Bit-o-Honey finish is the ultimate flavour sensation with these crispy, chewy, buttery, and wonderfully gooey pies.
J. Kenji López-Alt’s Seriously Foolproof Pan Pizza
400g bread flour, plus more for dusting
10g kosher salt, plus more for sprinkling
4g instant yeast
275g water
8g extra-virgin olive oil, plus more to coat pans and for drizzling
1 1/2 cups pizza sauce (such as Anthony Falco’s Pan Pizza Sauce [see below])
12 ounces grated full-fat, low moisture (dry) mozzarella cheese
2 ounces grated Parmesan or Pecorino Romano cheese
1. Make the pizza dough, keeping in mind that this is a slow-ferment dough that requires over 12 hours to be made properly, and that will benefit from even more time. (My normal schedule has been to mix the dough late at night before I go to bed. Form the pizza doughs the next morning. Wrap them and place them in the fridge to hold all day. Then remove from the fridge two hours before baking so they can temper at room temperature [see details below].)
2. Combine flour, salt, yeast, water, and oil in a large bowl. Mix with hands or a wooden spoon until no dry flour remains. (The bowl should be at least 4 to 6 times the volume of the dough to account for rising.
3. Cover bowl tightly with plastic wrap, making sure that the edges are well sealed, then let rest at cool room temperature (no warmer than 75°F) for at least 8 hours and up to 24. Dough should rise dramatically and fill bowl. In a hot kitchen, the dough may overproof near the end of that range.
4. Sprinkle top of dough lightly with flour, then transfer it to a well-floured work surface. Divide dough into 2 pieces and form each into a ball by holding it with well-floured hands and tucking the dough underneath itself, rotating it until it forms a tight ball with a smooth surface.
5. If you’re aiming to bake some pies in about 2 hours, skip the next step and move on to Step #7.
6. If you still need some time, place the doughs on a well-floured small rimmed baking tray, cover with plastic wrap, and place in the fridge for several hours (up to 36).
7. Pour 2 tablespoons oil in the bottom of two 10-inch cast iron skillets. Place 1 dough ball in each pan and turn to coat evenly with oil. Using a flat palm, press dough around the pan, flattening it slightly and spreading oil around the entire bottom and edges of the pan. Cover tightly with plastic wrap and let dough sit at room temperature for 2 hours (at room temperatures above 75°F, the dough may require less time to rise; at temperatures below 65°F/18°C, it may require more time). After the first hour, adjust an oven rack to the middle position and preheat oven to 550°F (290°C).
8. After 2 hours, dough should be mostly filling the pan up to the edges. Use your fingertips to press it around until it fills in every corner, popping any large bubbles that appear. Lift up one edge of the dough to let any air bubbles underneath escape, then repeat, moving around the dough until there are no air bubbles left underneath and the dough is evenly spread around the pan.
9. Top each round of dough with 3/4 cup sauce, spreading sauce to the very edge with the back of a spoon. Sprinkle evenly with mozzarella cheese, all the way to the edges. Season with salt. Drizzle with olive oil.
10. Transfer pan to oven and bake until top is golden brown and bubbly and bottom is golden brown and crisp when you lift it with a thin spatula, 12 to 15 minutes. Immediately sprinkle with grated Parmesan or Pecorino Romano cheese, if using. Using a thin spatula, loosen pizza and peek underneath. If bottom is not as crisp as desired, place pan over a burner on your stove and cook on medium heat, moving the pan around to cook evenly until it is crisp, 1 to 3 minutes. Remove the pizzas and transfer to a cutting board. Cut each pizza into 6 slices and serve immediately.
Now that we’ve learned to make the dough and bake the pizza, it’s time to hit the sauce.
Anthony Falco’s Pan Pizza Sauce
2 tablespoons olive oil
1 clove garlic, peeled and minced
2 tablespoons tomato paste
Pinch of chile flakes, to taste
1 x 28-ounce can whole San Marzano tomatoes, crushed by hand
2 tablespoons honey
1 teaspoon kosher salt, or to taste
Place a saucepan over medium-low heat, and add to it 2 tablespoons olive oil. When the oil is shimmering, add the minced garlic and cook, stirring, until it is golden and aromatic, approximately 2 to 3 minutes.
Add the tomato paste and a pinch of chile flakes, and raise the heat to medium. Cook, stirring often, until the mixture is glossy and just beginning to caramelize.
Add the tomatoes, bring to a boil, then lower heat and allow to simmer for 30 minutes, stirring occasionally.
Take sauce off the heat, and stir in the honey and salt, to taste, then blend in an immersion blender or allow to cool and use a regular blender.
Use as directed.
Okay, now that we’ve covered the basics, feel free to get creative.
Personally, I like my pan pizza pretty simple and basic: dough + sauce + cheese, with maybe some chili flakes, or some hot sauce, or some hot honey added at the last second, just before I’m about to chomp my still-blistering-hot slice.
Pepperoni is considered by many to be a classic variation, especially by contemporary hot honey enthusiasts, but I never make it at home.
What I will highly recommend is a version that’s still very much possible RIGHT NOW, while you can still find choice local cherry tomatoes around.
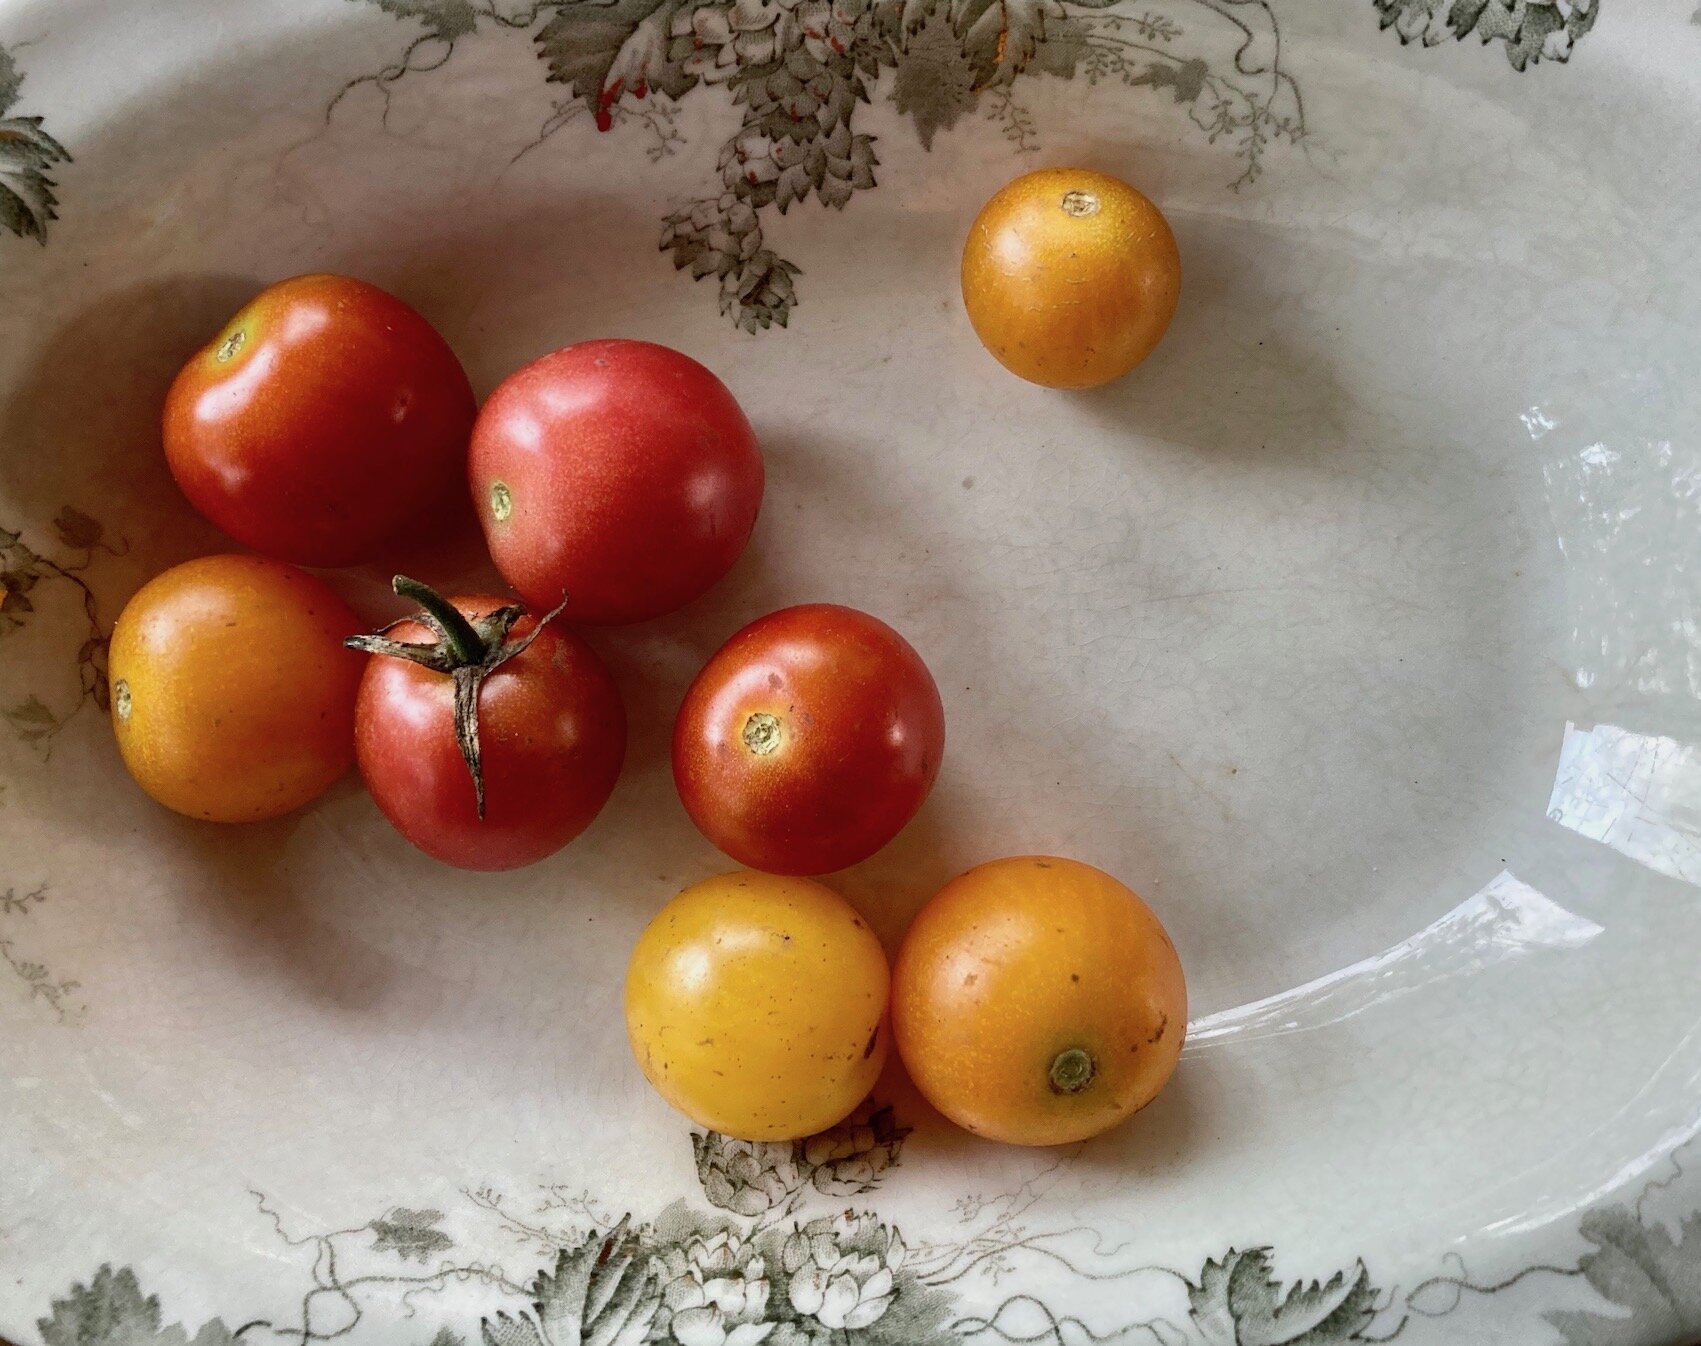
fig. c: How ‘bout them tomatoes?
It’s super simple. It just involves adding cherry tomato slices to a basic tomato-cheese pie, but if you source the right tomatoes, and you’re the kind of tomato fanatic that I am, they will take your pan pizza into the stratosphere. Plus, it’s got a cute name.

fig. d: What more do you need?
A.J.’s Tomayto-Tomahto Pan Pizza
Additional topping:
4-5 fresh, locally grown, organic cherry tomatoes (the sweetest, tastiest ones you can find) [per pie], sliced
Revised instructions:
Follow instructions 1-9 to a T. At that point follow these steps:
10. Transfer pan to oven and bake until top is golden brown and bubbly and bottom is golden brown and crisp when you lift it with a thin spatula, 12 minutes. Remove from oven. Distribute cherry tomato rounds evenly, pressing them gently into the molten cheese, while being careful not to press too hard, thereby scalding yourself. Sprinkle with grated Parmesan or Pecorino Romano cheese. Return to oven and bake for another 2-3 minutes, until tomatoes are golden-brown and Parmesan or Pecorino is also bubbling wildly. Using a thin spatula, loosen pizza and peek underneath. If bottom is not as crisp as desired, place pan over a burner and cook on medium heat, moving the pan around to cook evenly until it is crisp, 1 to 3 minutes. Remove the pizzas and transfer to a cutting board. Cut each pizza into 6 slices and serve immediately, keeping in mind that this pizza is a hot, molten, delicious, but dangerous mess at the moment. Be careful. Proceed with great anticipation, and an ounce of caution.
You’re all set.
What more do you need?
aj

fig. a: those other Chi Peps
Long-time readers of …an endless banquet will surely recall our deep, deep love for all things green chile. Actually, long-time friends of …an endless banquet might also be familiar with our [ed: well, Michelle’s, actually] deep, deep love of the Chi Peps—Los Angeles’s Red Hot Chili Peppers. But here I want to address those other Chi Peps: New Mexico’s Green Hot Chile Peppers.
Much of that love was first inspired by a game-changing trip I paid to the Land of Enchantment back in the 1990s. That was the first time I experienced the Cult of Green Chile full-on. I had it on eggs, in burritos, smothering home fries, on enchiladas, and in countless other ways, for breakfast, lunch, and dinner. The Green Chile Ritual never grew old for me, and I’ve never really shaken it.

fig. b: The Cult of Green Chile
In fact, I’ve been trying to replicate it, thousands of miles from New Mexico, for many years now without the benefit of the very peppers that are the essence of the Cult of Green Chile: genuine Hatch chiles. Not the ones that you can find in the little tin cans in supermarkets across America (although, god bless ‘em—those do come in handy sometimes), but the entire spectrum of green chiles (mild, medium, medium-hot, hot, and extra hot) that are famously grown in and around Hatch, NM—in the southern part of the state—versions of which have been a staple of the regional cuisine for centuries.
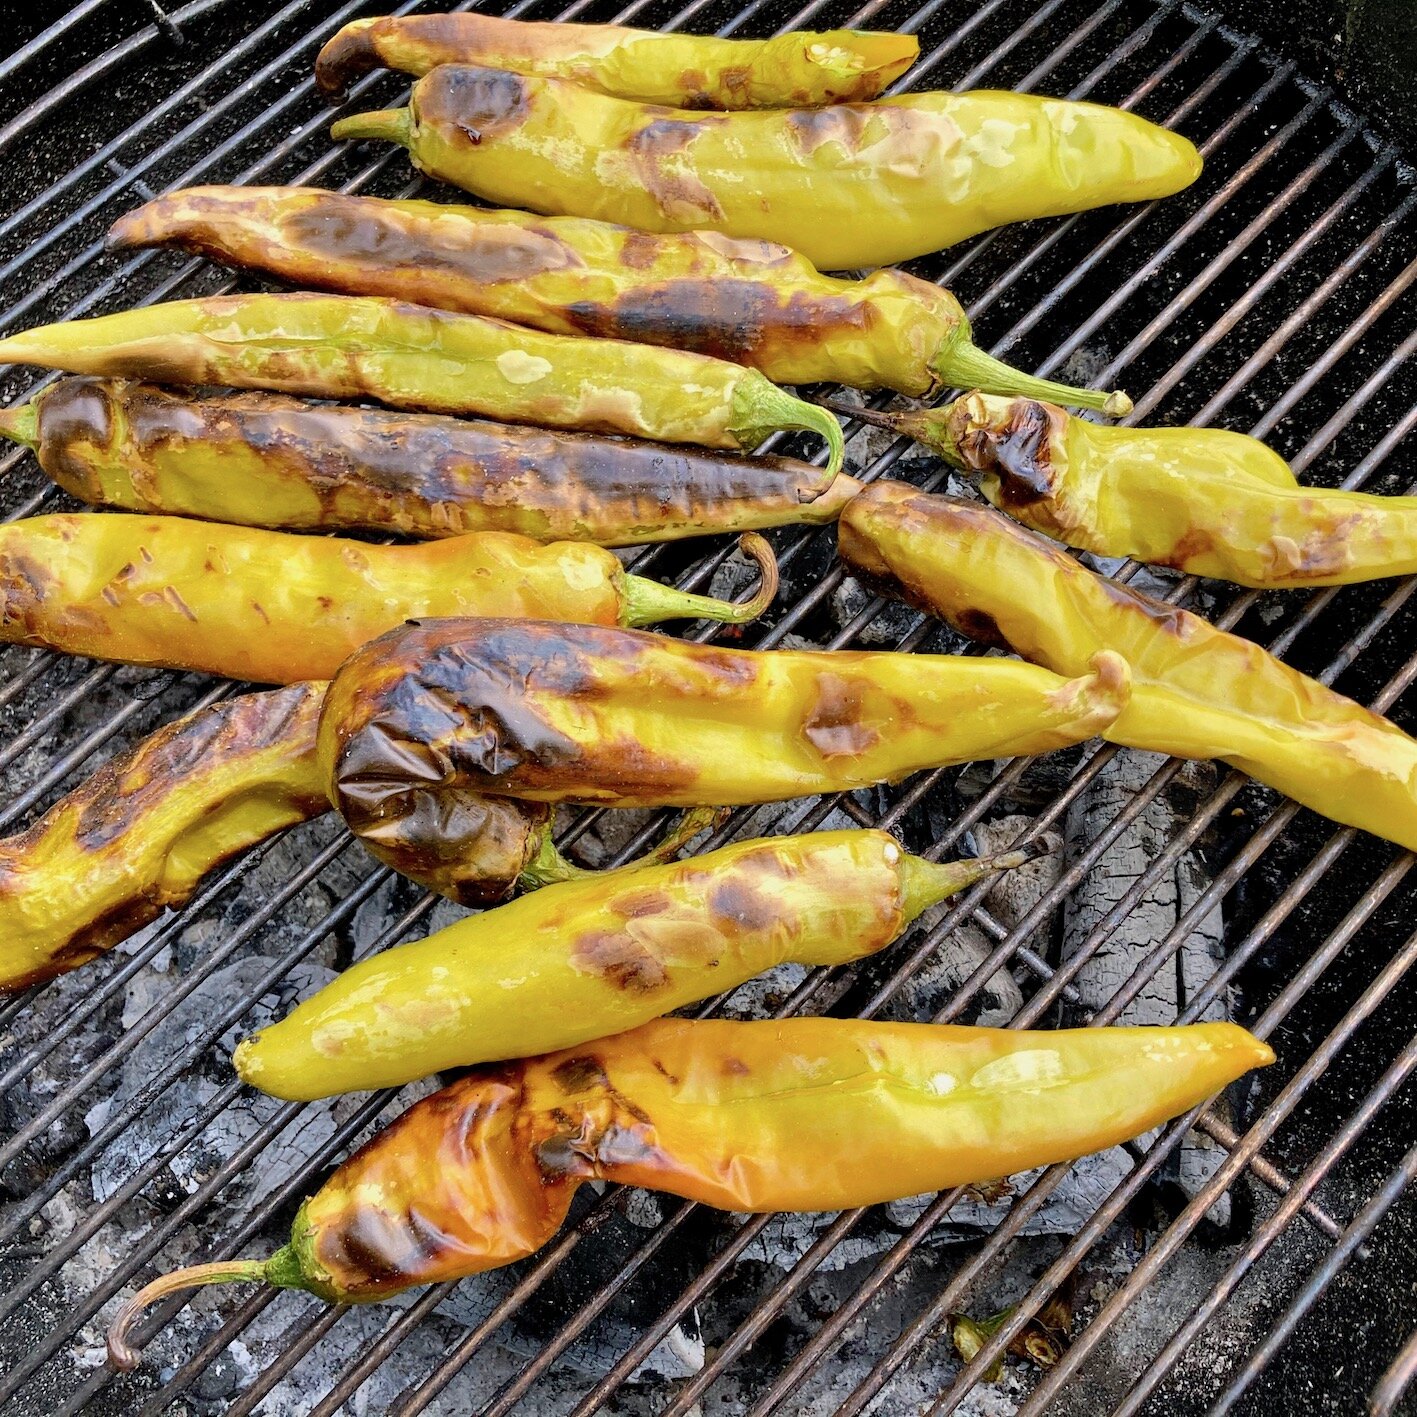
fig. c: fire-roasted green chiles
The preferred way of preparing these treasured peppers is to roast them over a fire—traditionally, a wood fire, but these days frequently a propane flame—peel them, seed them, and then make a salsa with them. This is the “green chile” that then appears in countless New Mexico specialties, from enchiladas to cheeseburgers, and everything in between.
In New Mexico, in the late summer and early fall, you can find makeshift chile roasting operations scattered all across the state, often in the parking lots of local supermarkets. Your chiles are roasted before your eyes in an oversized tumbler, and a minimum order is 20 pounds of peppers.
I’ve always wanted to visit New Mexico at this time of year to witness this spectacle with my own eyes—I mean, what better time to experience the Green Chile Ritual once again? I became even more fixated on this plan after reading David Tanis’s account of his visit to Hatch and environs at the height of Green Chile Season in Saveur a few years back. Initially 2020 seemed like it might be the year that would bring a return visit to New Mexico, just in time for the Hatch Green Chile Festival—just like Tanis—but then everything about this year changed quite drastically.
However, a few weeks ago, it occurred to me that if you can’t actually go to the festival, maybe you could try to bring the festival (or at least part of it) home. After all, fields had been planted. A crop was due to be harvested. So I did the logical thing and reached out to The Hatch Chile Store, and the next thing I knew I had 25 pounds of freshly picked peppers en route to me via express delivery.
The Hatch Chile Store offers a number of different peppers to choose from—from mild “1904” chiles to extra-hot “Lumbres”—but I opted for their Big Jims. Tanis describes this variety as, “large, fleshy, [and] moderately hot.” I’m not sure how Big Jim feels about that, but I knew this was a popular variety—one that’s got a reputation for being particularly meaty, and particularly easy to peel (win-win).
![fig. d: “large, fleshy, [and] moderately hot”](https://images.squarespace-cdn.com/content/v1/5407bbece4b0d617570ff0ed/1600222923680-AGNH71HXWWX9Q1JLOWG8/sea+of+green.jpeg)
fig. d: “large, fleshy, [and] moderately hot”
Sure, you could order genuine Hatch chiles (including Big Jims) roasted, peeled, and seeded—either canned in jars, or frozen—but what would be the fun in that? I wanted to smell that “fire-roasted green spirit” Tanis had written about. Plus, I’ve always loved firing up the grill and roasting peppers for my improvised non-Hatch green chile concoctions—why wouldn’t I want to do the same with the real deal?
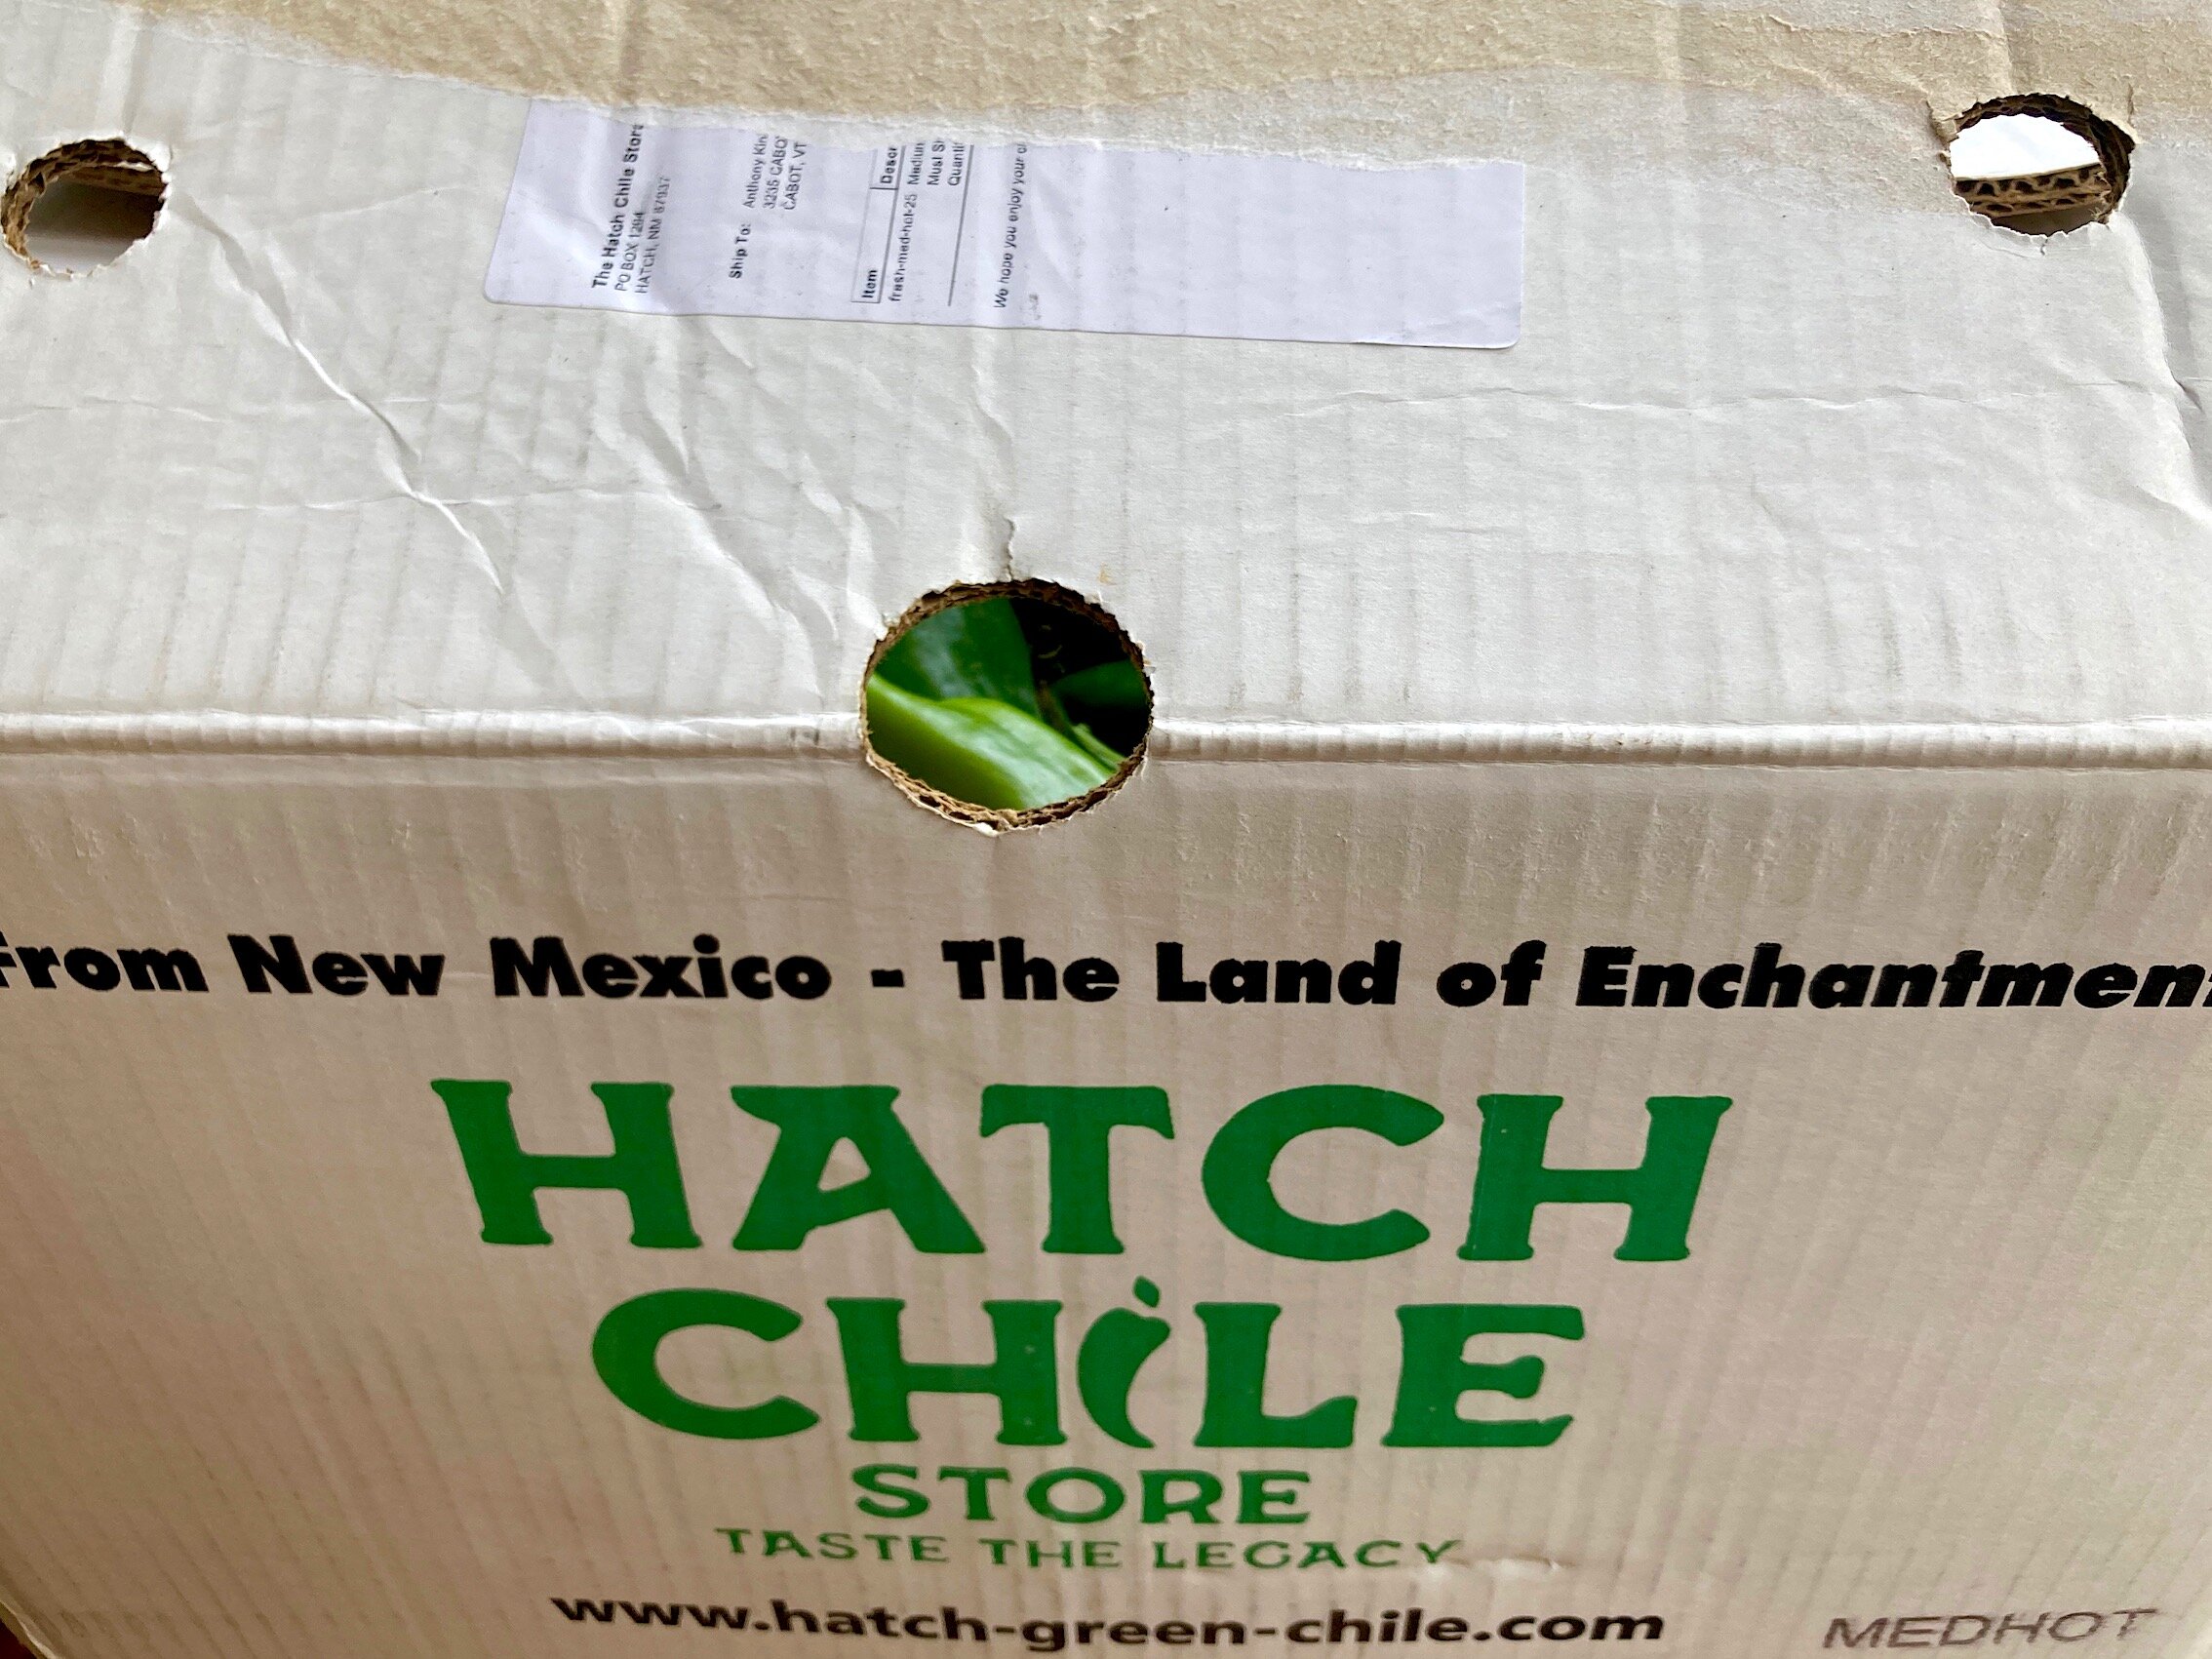
fig. e: peek-a-boo
That box of Big Jims showed on a Thursday afternoon. By that evening, I’d already roasted about twenty of those bad boys, made my first batch of genuine Hatch green Chile salsa, and used it to dress a smoked pork burrito. And by the following afternoon—using a battery of three BBQs—Michelle and I had roasted, peeled, and seeded the remaining 20+ pounds of peppers, and packed them in Ziploc bags to keep in the freezer.

fig. f: three grill day
The yield is far less than 25 pounds of green chile fillets and strips, of course—the stems, seeds, and peels all weigh something, and the peppers lose some moisture in the process of being roasted. But the chiles also gain a considerable amount of flavour in the process—and the result is simultaneously sweet, spicy, smoky, bitter, and herbaceous, and utterly addictive.
If ordering chiles online seems like too much of an ordeal (and an expenditure) for the taste of green chile, who knows? Maybe there’s someone in your locale who’s growing some actual New Mexico chiles and bringing them to market. If you happen to be in Montpelier, VT at this time of year, you can always drop by the farmers’ market and visit the LePage Farm stand. You might not find 25 pounds of Hatch peppers, but you will find a basket full.
And if not, as I’ve detailed elsewhere, you can make something approaching a New Mexico green chile salsa with other more readily available peppers: like Anaheims, Poblanos, Cubanelles, Serranos, and Jalapeños. At the very least, you can make use of the wonderful local onions and garlic that are so plentiful in so many parts of North America right now when you do.
Green Chile Salsa
1 medium onion (preferably sweet) chopped
1 tbsp olive oil
1 clove garlic, minced
1/2 cumin seeds, toasted and ground
fire-roasted green chiles
tomatillos (optional)
chicken broth or water
1 tsp masa harina
salt and pepper to taste
Sauté your onions in the olive oil until nice and soft. Add your chopped garlic and some toasted and ground cumin seeds. Add your roasted green chiles, some tomatillos, if you're using them, and your chicken broth. Be judicious with your use of liquid (chicken stock or water). You don't want to add too much, but the idea here is to add enough that you can cook your sauce down, uncovered, reducing it into a thing of beauty. This shouldn't take all that long. No more than about half an hour, if you've added the right proportion of broth/water. And keep in mind that if you’re using tomatillos, they will give off quite a bit of liquid. If you go that route (and it’s a wonderful path to take), it’s up to you to decide what your ratio of green chiles to tomatillos should be, but I would recommend about 3:1 (e.g., 1 1/2 cups of green chile strips and 1/2 cup of tomattilos). Any more and you’re really making a salsa verde, and not a green chile. Add a sprinkle of masa harina toward the end of this process if you'd like to thicken your sauce further and give it a bit of depth. The goal here is to create a fairly thick, chunky sauce that will be ideal for everything from dipping chips into to dressing a burger. And, like I said, it ought to taste like a thing of beauty, too.
This is another absolute classic, and one that was hugely inspired by a recipe from David Tanis’s A Platter of Figs And Other Recipes. Respect is due!
Green Chile Stew
5 pounds well-marbled boneless pork butt, cut into 2-inch cubes
salt and pepper
2 tbsp vegetable or olive oil
2 large onions, finely diced
4 to 6 garlic cloves, chopped
2 tsp cumin seeds, toasted and finely ground
1/2 cup chopped tomatillos, fresh or canned
6 large carrots, peeled and chunked
1 cup chopped roasted green chiles*
1 tbsp masa harina
8 cups water or chicken broth
chopped cilantro
hot corn or flour tortillas, to serve
Season the pork with salt and pepper. Heat the oil in a large Dutch oven or other heavy-bottomed pot. Add the meat, in several batches, without crowding, and brown it lightly. Transfer to a platter or tray.
Add the onions to the pot and brown them. Add the garlic, cumin, tomatillos, carrots, and green chiles, then sprinkle the masa harina over and stir. Salt the mixture, then return the browned meat to the pot and stir well. Cover with the broth and bring to a boil.
Cover the pot, turn the heat to low, and simmer gently for 2 to 3 hours—until the pork is tender and shreds easily.
Taste the broth and adjust it, adding salt or more green chile as necessary. The broth should be well seasoned and fairly spicy. Simmer for another 30 minutes or so, until the pork is exceedingly tender. Skim any fat from the surface of the broth.
Let the stew rest for an hour or more. Refrigerate overnight if desired (this allows the flavours to meld even more).
To serve, reheat the stew and ladle into warmed bowls. Sprinkle with chopped cilantro and accompany with hot tortillas.
Serves 8 to 10.
* Tanis notes that it takes about 12 large fresh chiles to produce 1 cup of chopped roasted chiles. It's preferable to grill them over an open fire, but you can also blacken them under the broiler or directly over a gas burner, in a pinch.
Green Chile Stew is quite literally a dish that makes people crazy. I’ve seen it happen. People go back for 3, 4, 5 helpings if you’re not careful. Be careful. You’re going to want some leftovers. Trust me.
aj

Our beloved pegboard wall in our place is Vermont is very much inspired by the practical, highly cooked-in kitchens of some of our heroes, like the legendary Judith Jones.
Jones, of course, spent much of her life in Greensboro, Vermont, not far from where our house is. However, here she is in her kitchen in Manhattan, and you can see here, too, her kitchen featured a lovely combination of high and low: Moorish tiles together with pegboard from which to hang her pots, pans, and utensils.

If you watch this video from the Wall Street Journal, you can see Jones working her stove and ruminating on the challenges and pleasures of home cooking.
There’s something about your pots and pans being exposed, about being able to see them on the wall beside you that makes cooking even easier, and even more enjoyable.
aj

fig. a: height of season
Speaking of tomatoes…
If you’re looking for another way to make use of the abundance of peak tomatoes available at the moment, look no further.
This is a show-stopper of a recipe that has been a house staple ever since we first encountered it in Richard Olney’s A Provençal Table: The Exuberant Food and Wine from the Domaine Tempier Vineyard (a.k.a., Lulu’s Provençal Table: The Exuberant Food and Wine from Domaine Tempier’s Vineyard). In fact, in many ways, it was this very dish that began what could safely be labelled a long-term Richard Olney obsession.
As Olney makes clear, this dish is essentially a spread, one made with the finest tomatoes and the most perfect eggplant you can find, it’s versatile—you can serve it hot, warm, tepid, or cold—and it’s a classic part of the Provençal apéro repertoire. It’s a simple dish, but one whose poetic name—Bohèmienne—captures its mysterious transcendental properties.
Olney clearly thought very highly of the Bohèmienne, and it’s a dish whose magic and whose associations with Bandol’s Domaine Tempier vineyard is crucial to an understanding of that Berkeley-Provence connection that brought together the talents and the vision of Olney, Alice Waters, Kermit Lynch, and others.

fig. b: a fine specimen of an eggplant
Just as the tomatoes began to hit their peak this year, we received a letter from our dear friend OM, who recalled encountering this fabled eggplant-tomato dish at a dinner party we threw years and years ago in Montreal, during one of our first attempts to recreate the grandeur of a true Grand Aïoli—one that Olney himself would have been proud of. I’m sure these early stabs at Provençal cuisine in the grand tradition must have been hilarious—they were definitely high on enthusiasm, even if we were mere novices at the time—but apparently the Bohèmienne left an impression. “I remember it being deeply satisfying, salty and pungent, with that lovely creaminess of eggplant at its peak,” was the way OM recalled it, and with a surplus of tomatoes and eggplants on her hands, she asked if we could provide her with the recipe. We were all too happy to help out.
The dish’s pungency—and some of its salt—comes from the addition of salt anchovies. If you don’t have salt anchovies on hand, you should try to find anchovies packed in olive oil. And if you’d prefer a vegetarian version (vegan, even) of the Bohèmienne, you can just omit them—you’ll have to finesse the dish with some extra salt (and maybe a little extra love), but it’s quite possible to make a luscious version that’s entirely anchovy-free. But I really, really recommend the anchovies if you’re not a strict vegetarian. They’re the “secret ingredient” that really makes this dish sing.
And while I’ve placed an emphasis on the eggplant and the tomatoes—with good reason—the third most important component of a Bohèmienne is the garlic, of course. Use the freshest, juiciest hard-neck garlic you can find (preferably local and organic). Your tomatoes and eggplant are bursting with flavour—why shouldn’t your garlic be as well?

fig. c: garlic in august
Otherwise, making a great Bohèmienne is all about the method. As usual, is Olney is nothing if not precise when it comes to his instructions. Avoid cutting corners and this Bohèmienne will pay you back handsomely.
We were so moved by OM’s letter—and transcribing the recipe for her made me so ravenous for Bohèmienne—that we promptly made a batch a couple of days later. The next day, we brought part of our batch to a small (socially distanced) dinner party, and though the table was loaded with goodies of all kinds, in many ways, it was this rustic eggplant-tomato spread that stole the show. Nobody had had a concoction like it ever before, and everything about the dish spoke SUMMER loud and clear.
Bohémienne
6 tbsp olive oil
1 large onion, halved and finely sliced
3 cloves garlic, crushed and peeled
2 pounds eggplant, peeled, sliced into rounds, salted on both sides for 30 minutes and pressed dry between paper towels
2 pounds tomatoes, peeled, seeded, and coarsely chopped
3 salt anchovies (or 6 anchovy fillets)
salt and pepper
Warm 4 tbsp of the olive oil in a large, heavy pot [Olney recommends a “wide-surfaced cooking vessel,” one whose surface area will aid with “evaporation and reduction”]. Add the onion and cook over low heat, stirring regularly with a wooden spoon, until softened but not coloured. Add the garlic and eggplant; cook until softened, stirring regularly. Add the tomatoes, turn up the heat, and stir until they begin to disintegrate and the mixture begins to boil. Lower the heat to maintain a simmer, uncovered, for an hour or more. Stir regularly, crushing the contents with the wooden spoon and, after about 45 minutes, crush regularly with a fork to create a coarse purée from which all liquid has evaporated. Toward the end, it should be stirred almost constantly to prevent sticking and the heat should be progressively lowered.
Pour remaining 2 tbsp olive oil into a small pan, lay out the anchovy fillets in the bottom, and hold over very low heat until they begin to disintegrate when touched or when the pan is shaken. Remove the eggplant-tomato purée from the heat and stir in the anchovies and their oil. Taste for salt and grind over pepper. If prepared in advance, transfer the bohémienne to a bowl and leave, uncovered, to cool completely before covering and refrigerating.
serves 8
Serve with crusty bread and a cold, crisp glass of rosé—a beautiful Bandol like Domaine Tempier’s rosé would be wonderful, of course, but the price on these have crept up steadily over the years, and any one of a number of French or Italian rosés or rosatos would also make for an excellent accompaniment. At the moment, we’re particularly fond of an especially ethereal Corsican wine from Domaine de Marquiliani known as “Rosé de Pauline”. On the night we brought the Bohèmienne to that recent dinner party, it was paired with Swick’s lusty “Only Zuul.”
Though we typically serve our Bohèmienne warm, or at room temperature, Olney notes that the dish is sometimes served hot, as a gratin. Just "spread it into a shallow oven dish, sprinkle it with dried bread crumbs and olive oil,” and bake it in the oven.
aj

fig. a: Can you see where this is going?
We love sandwiches of all kinds, of course—lobster rolls, hoagies, smoked meat, club, po’ boys, muffulettas, chopped rib, falafel, burgers, even the lowly P.B. & J.—but there’s one sandwich that stands above them all at this time of year, when tomatoes are plentiful and at the peak of perfection, and that’s the B.L.T.
All the constituent elements of the B.L.T. serve their purpose and hold importance—including the bread, mayonnaise, bacon, and lettuce—but as far as we’re concerned the very most crucial ingredient is the tomato. If you don’t have a perfect tomato to start with, really, what’s the point? You could make the most beautiful mayonnaise from scratch, fry up the smokiest, most delicious artisanal bacon, source the sweetest, most tender-crunchy lettuce leaves, and even bake the most perfect sandwich bread imaginable (or find it at your local artisanal bakery), but if the tomato was unripe and tasteless, the whole contraption would fall apart.
Lucky for us, we’ve been able to score loads of beautiful, juicy, ripe local tomatoes recently, we have access to our favourite Northeastern bacon (North Country Smokehouse, out of Claremont, New Hampshire), and we’ve even been able to find local, organic iceberg lettuce—in other words, the B.L.T. trifecta. We’re a little less obsessive when it comes to the bread and mayonnaise. We bake plenty of our own bread and make our own mayonnaise with regularity, but we’re perfectly fine with using supermarket brands when it comes to these two elements. Recently, we’ve been fond of using Hellmann’s mayo and Pepperidge Farm’s Butter Bread or Honey White.
But it’s the tomato we’re most particular about. And right now, my favourite B.L.T. tomato is an heirloom variety known as the Paul Robeson.

fig. b: Paul Robeson puts on quite a show
The Paul Robeson is a variety of Russian origin that was named in honour of the African-American singer, actor, and activist—”a sandwich tomato with a tang, an extraordinary tomato for an extraordinary man,” as the folks at Fedco Seeds put it.
You don’t have to use an heirloom variety, of course, but for a true B.L.T., it’s imperative to use a big, juicy, supremely tasty slicing tomato. Delicious cherry tomatoes will do in a pinch, but for the full effect, it really has to be a slicer that’s just bursting with juicy goodness. All the greatest sandwiches are messy affairs—or at least they should be—and the B.L.T. is no exception. Your plate should be a glorious mess when you’re done. Napkins and paper towels should be an absolute necessity. Possibly even a shower.
Lastly, the bread must be properly toasted. It should be slathered with mayonnaise. (I’m a strong proponent of mayonnaise being slathered on both slices of toast.). And it’s absolutely obligatory that the tomatoes be salted in advance of sandwich construction. Okay, maybe it’s not “obligatory,” especially if you’re using a salty bacon, but, personally, I think the salt really helps release the tomato’s full range of flavours.
Now, as much as I love a true B.L.T. made with excellent bacon, we don’t always have bacon around. In fact, most of the time we don’t. Mostly it’s reserved for “special occasions.” But that’s okay, because if the tomatoes are exceptional, I get nearly as excited about an L.T. sandwich as I do about a B.L.T. And that’s actually the sandwich we have with the greatest frequency during peak tomato season. (If you’re really missing the salt & smoke of those crispy bacon slices, you could always sprinkle a little smoked salt on your tomatoes in place of your usual sea salt or kosher salt. You won’t get quite the same texture, and you won’t have the intoxicating presence of bacon fat adding to the alchemy, but at least you’ll get some of that smoky saltiness.)
And while I’m a big fan of mayonnaise, and I realize it’s almost heretical to say so, I’m also perfectly fine with a mayo-less L.T. sandwich made with a vinaigrette—as long as the tomatoes are excellent.
But the version I love the most is that classic version—the one with the perfect tomatoes, the choice bacon, and the proper lettuce, bread, and mayonnaise combo. Especially if it’s served sliced on the bias.

fig. c: B.L.T. lunch
Preferably with a cold beverage and some potato chips.
One friend who joined us for a socially distanced B.L.T. lunch earlier this summer called the A.E.B. version “the Platonic ideal of the B.L.T.” The last time Michelle finished one, she just said (in typical Michelle fashion), “Man, that was really, really good.”
All I know is that this is the meal that I crave the absolute most right now. I’ve been having at least four B.L.T. and/or L..T. sandwiches per week for the last several weeks now (usually L.T.s, actually), and each and every one has been just as satisfying as the last. Usually more so.
aj

Braised mushrooms
Sesame green beans
Pickled radishes

Poached shrimp
Seared scallops
aj

Grilled corn with miso butter, Korean chili threads, and scallions
aj

Salade Niçoise
aj
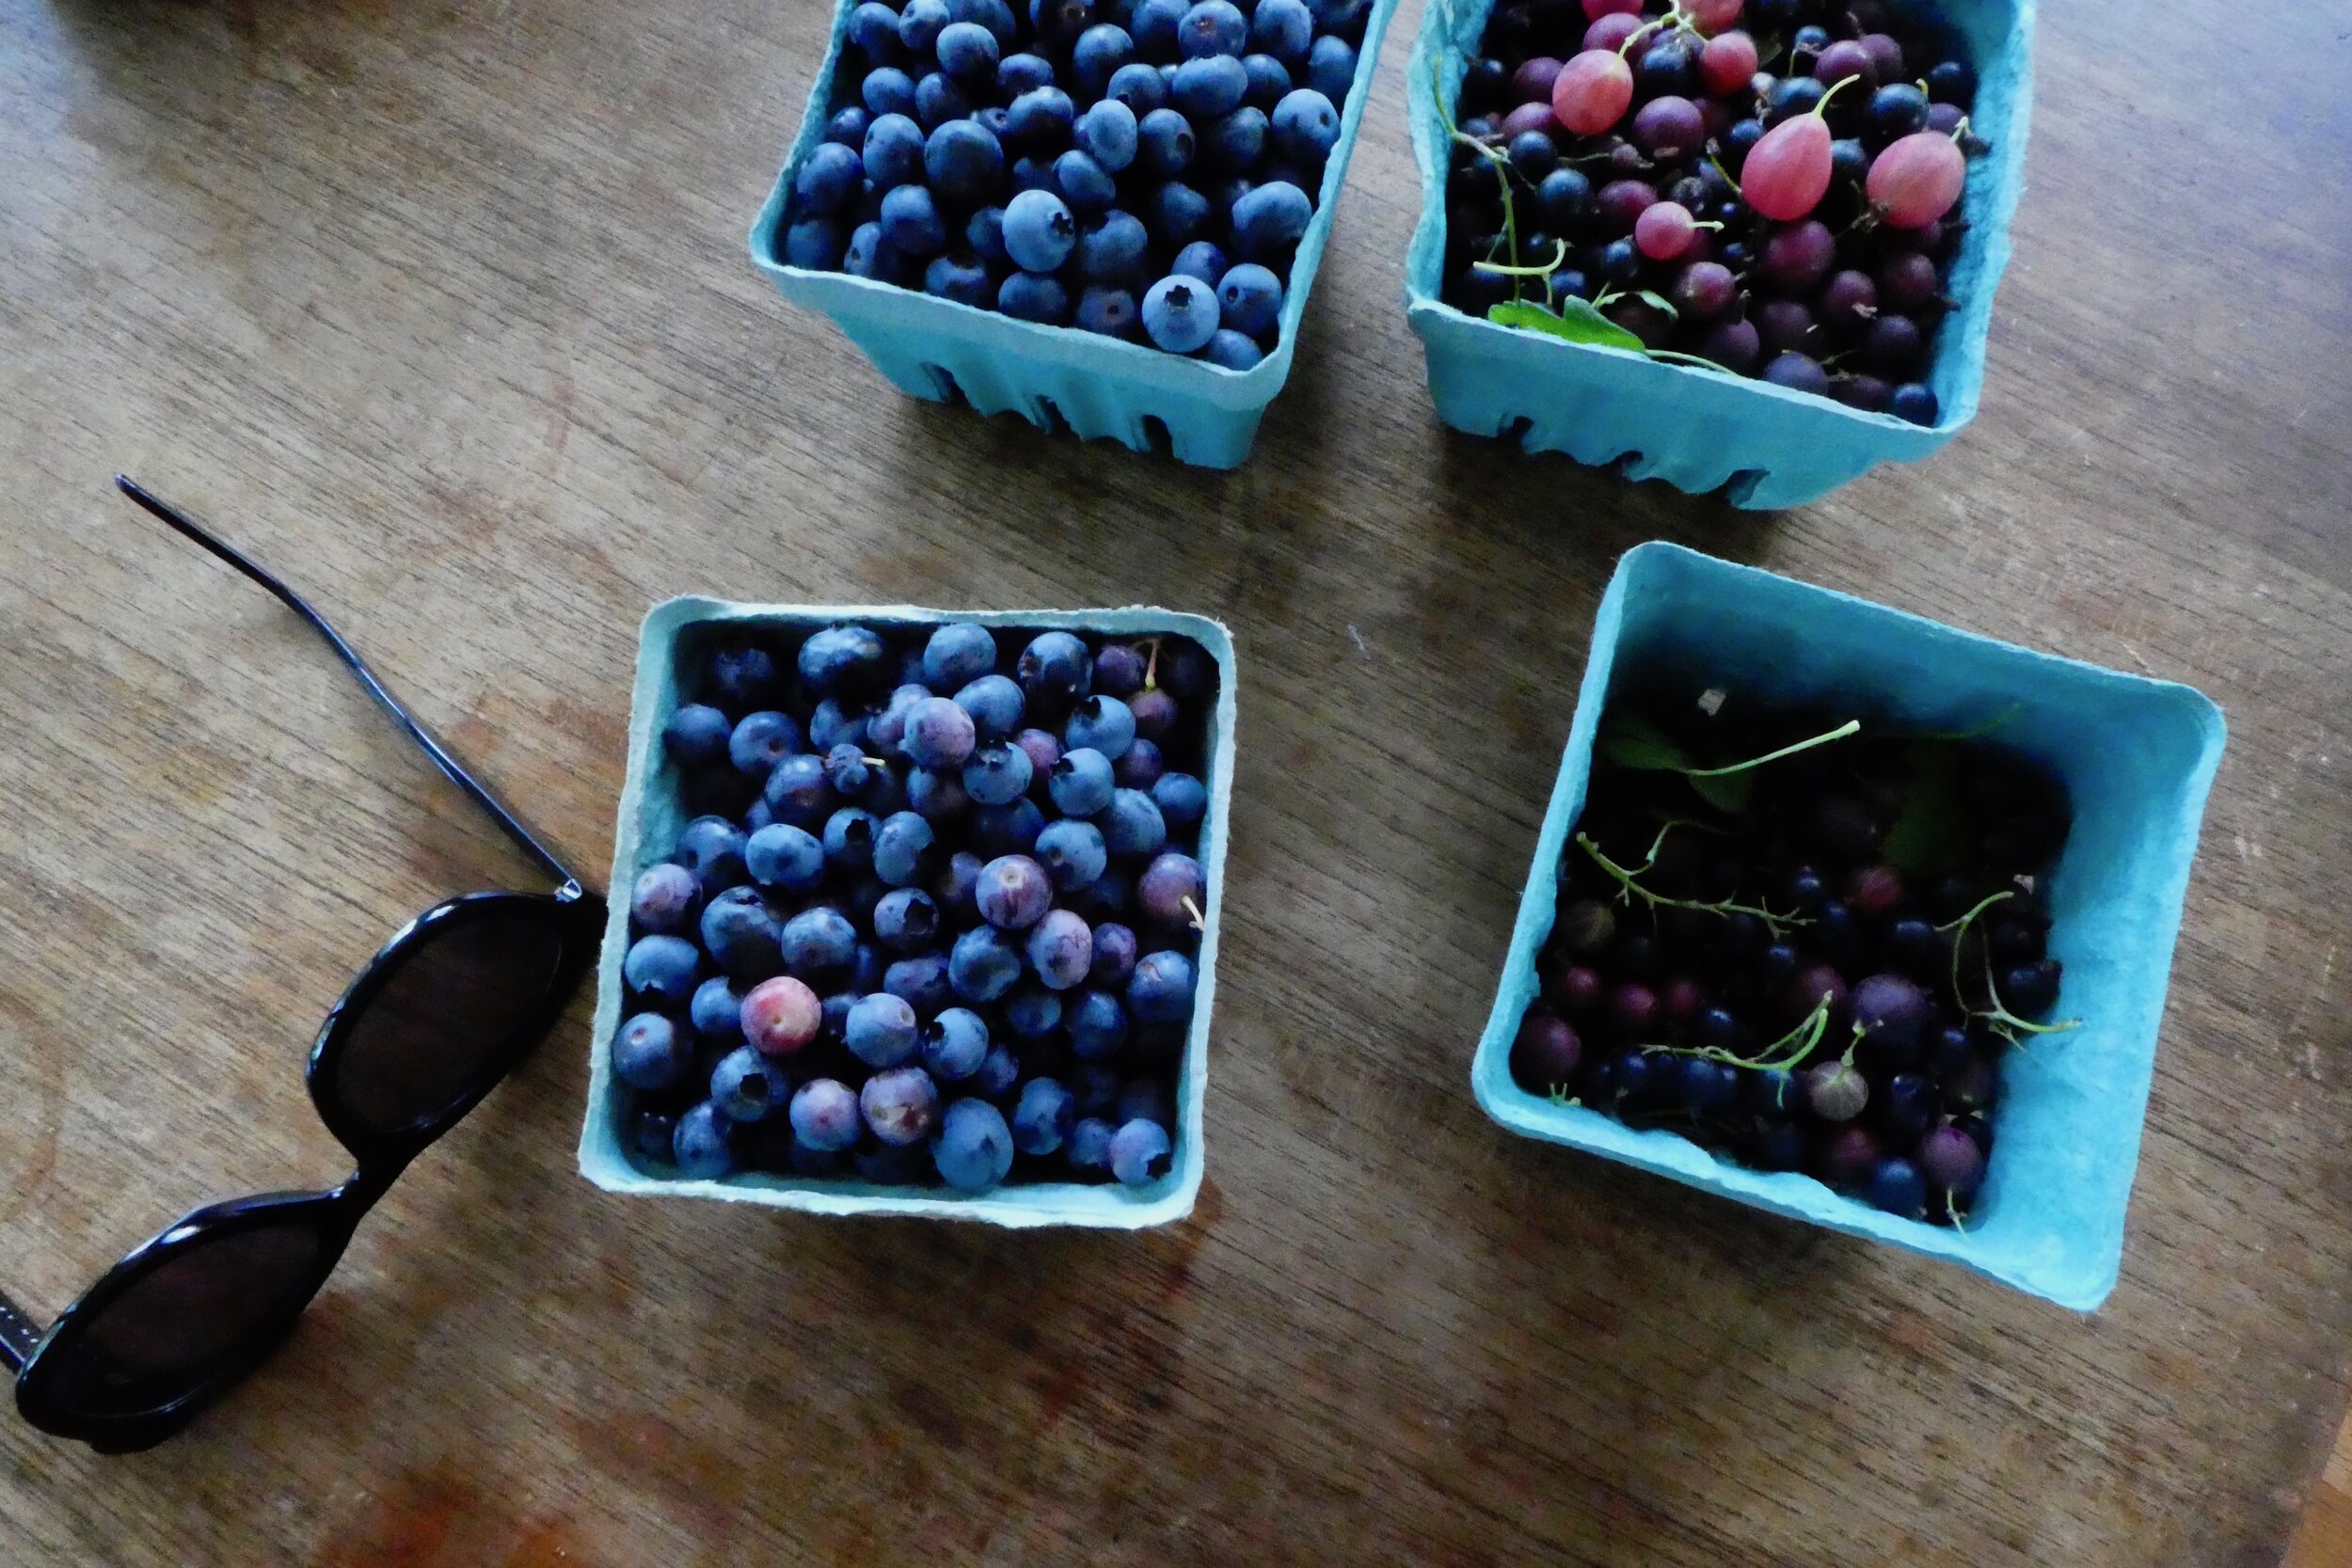
fig. a: out of the berry patch
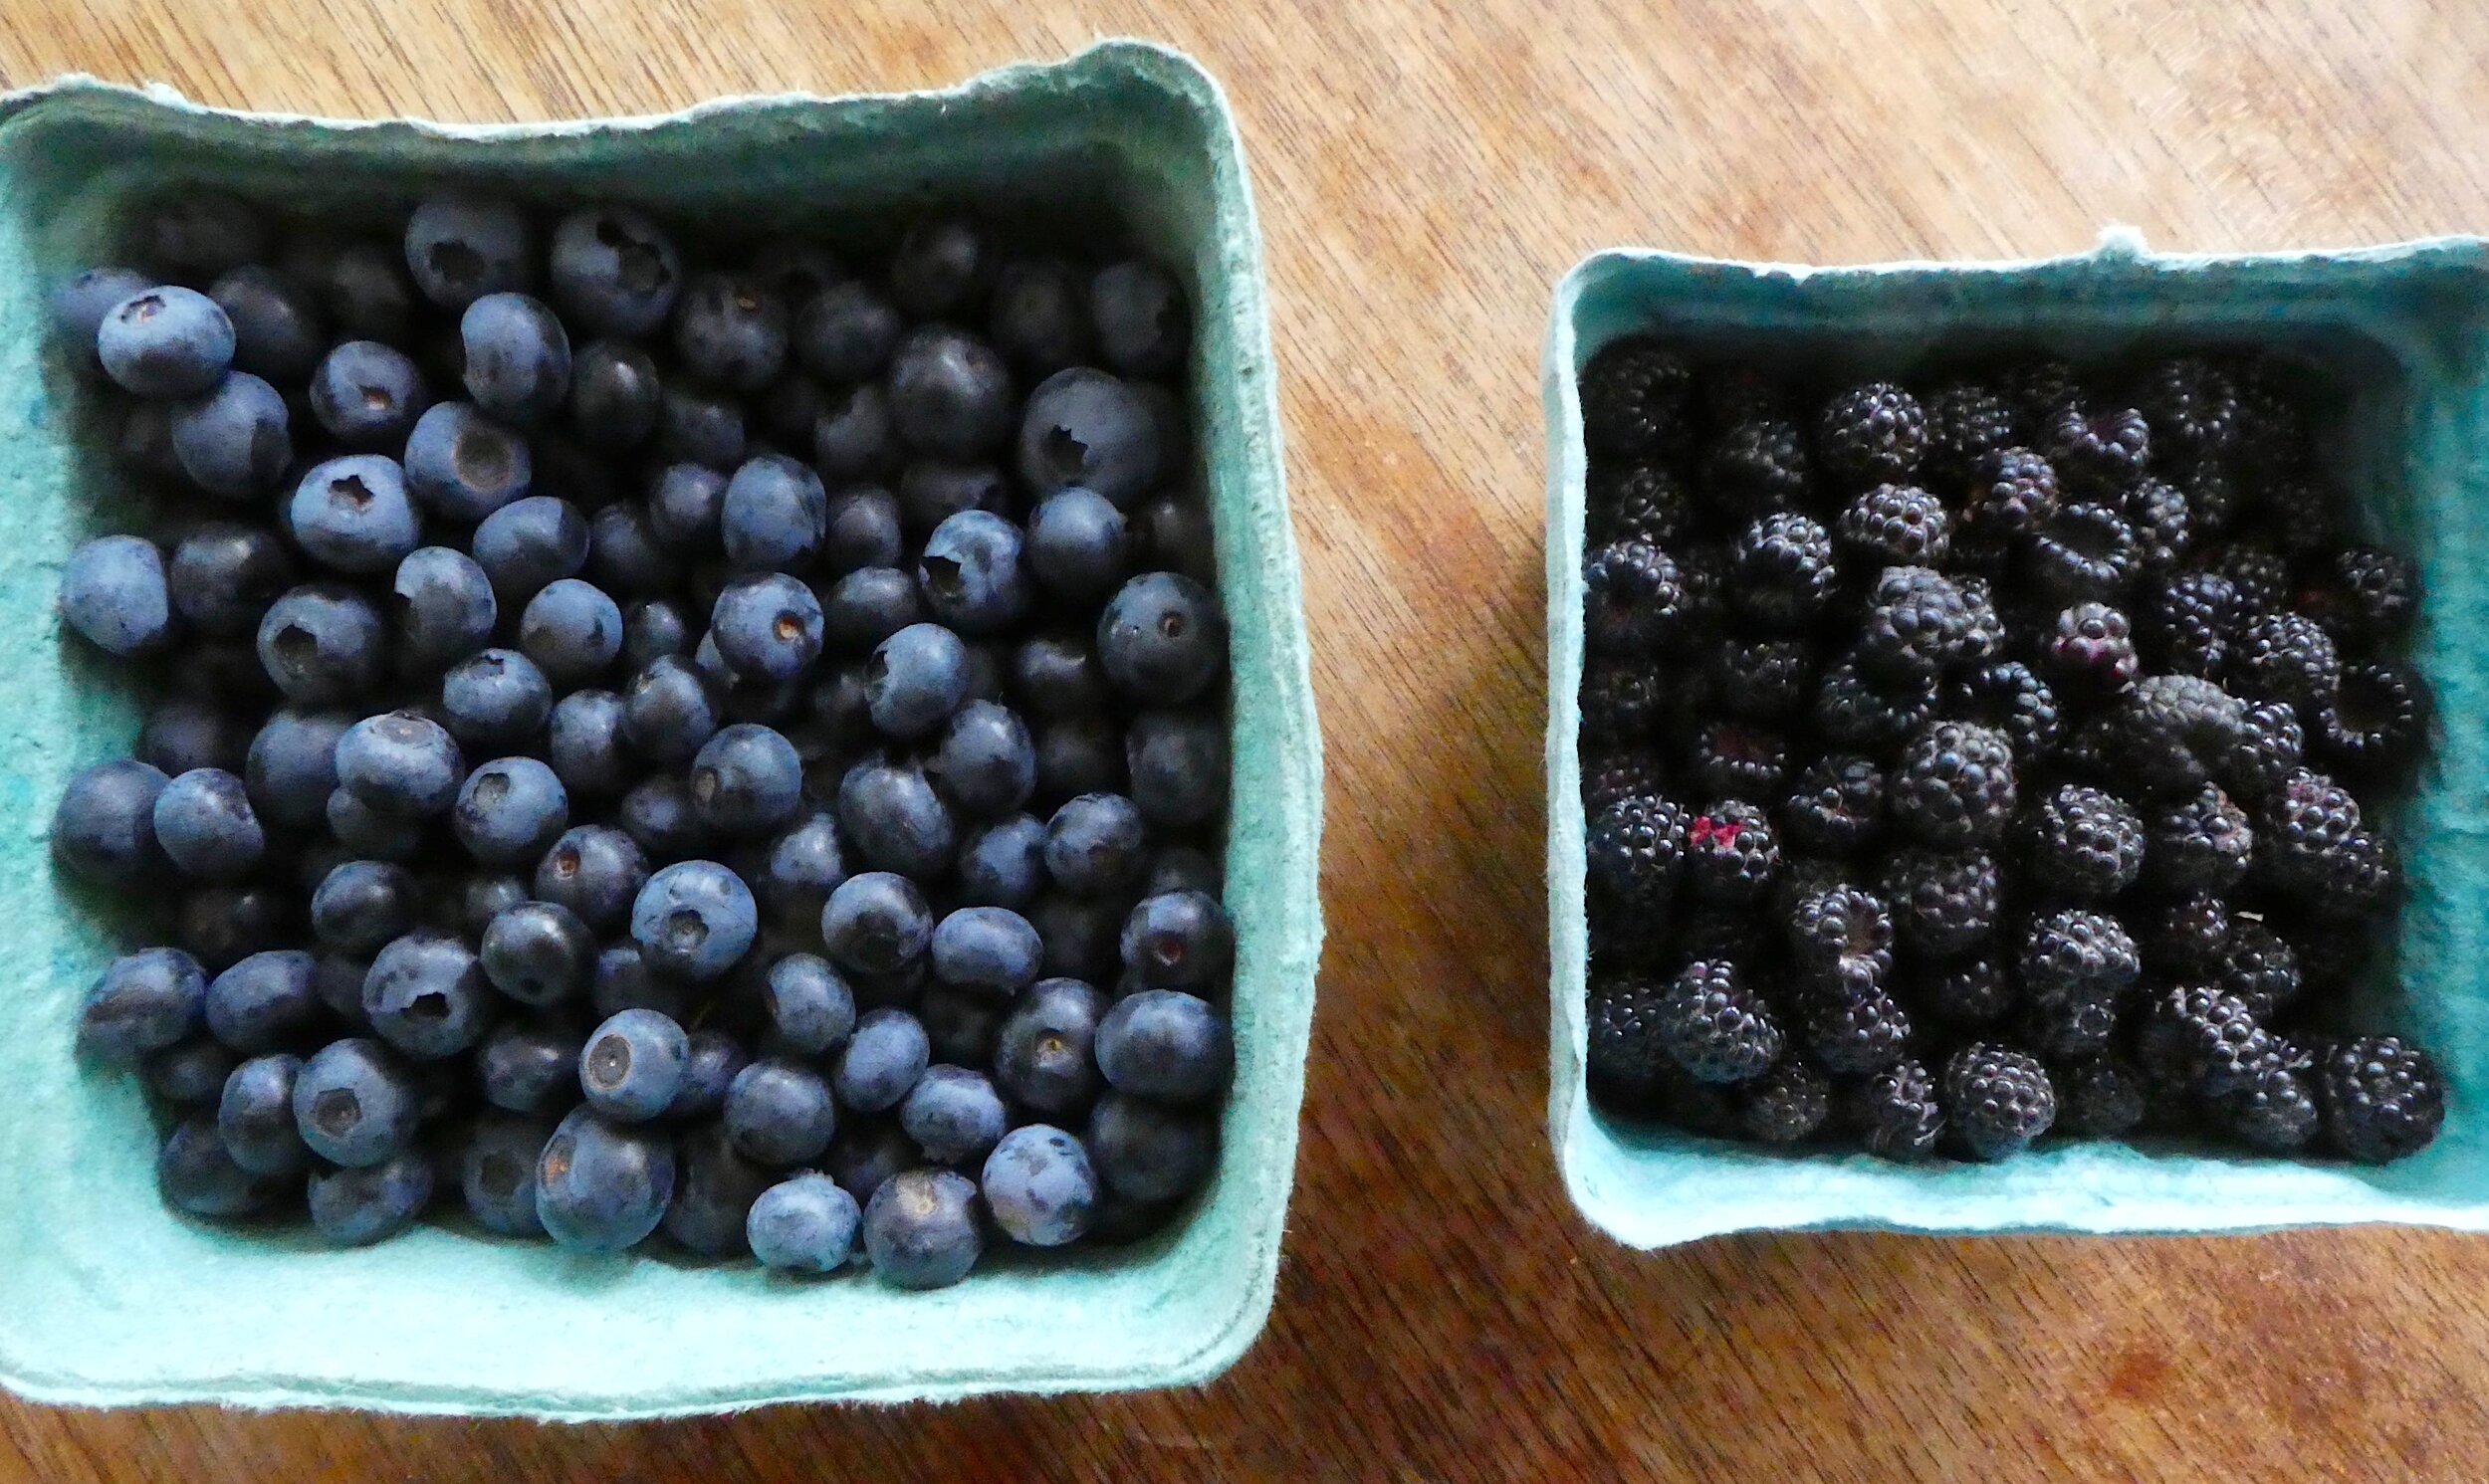
fig. b: bloobs & black raspberries
If you’re going to have an absolutely bonkers berry year—and we’re definitely experiencing one in our little neck of the woods right now—there are a few crucial recipes you need to go along with it. And in my mind, one of them’s gotta be a proper pancake recipe.
Sure, you can fold berries directly into your batter to make, say, blueberry pancakes—you might even have a favourite blueberry pancake recipe on hand—but I’m talking about a “plain” (but definitely not plain) pancake recipe. One that you can adorn with an unholy combination of butter, syrup, and freshly macerated berries as they come hot off the griddle. One that will serve you well even when fresh, local berries have gone out of season. One that’s truly heavenly.

fig. c: out of “the grocery store”
In this case, the recipe I have in mind is one that first appeared in Canal House Cooking no. 6 (“The Grocery Store”) way back in 2011. But when Melissa Hamilton and Christopher Hirsheimer—the prodigious talents behind Canal House—compiled a year’s worth of their best recipes for their collection Canal House Cooks Everyday the following year, it’s not one that made the cut, strangely. Hamilton & Hirsheimer were generous enough to share Hirsheimer’s family recipe for “Buttermilk Love Cakes” in their book—and that’s a blessing, there’s no doubt about it—but this recipe is similarly phenomenal, and it’s maybe just a tiny bit easier to get exceptional results with, because it’s maybe just a tiny bit easier to source good sour cream (which this recipe calls for) than it is to source good buttermilk (which the “love cakes” call for). (Then again, maybe not—depends on where you live.)

fig. d: these gorgeous pancakes are a delicious part of a complete breakfast
Like virtually all of the very best pancakes, these sour cream pancakes are light as a feather and anything but banal. These are pancakes that turn out beautifully, they’re supremely flavourful, and they marry wonderfully with the mixture of raspberries, blueberries, and black raspberries we’ve been enjoying in recent days.

fig. e: the red & the blue
So without any further ado…
Canal House Cooking’s Sour Cream Pancakes
1 cup sour cream*
3 large eggs, separated
2 tablespoon melted butter
7 tablespoons cake flour
1 tablespoon sugar
1/2 teaspoon baking soda
1/2 teaspoon salt
Vegetable oil
Whisk the sour cream and egg yolks together in a medium mixing bowl. Whisk in the melted butter. Put the flour, sugar, baking soda, and salt into a sieve and sift into the sour cream mixture. Lightly whisk until just mixed [a few lumps won’t hurt anything, according to Hamilton & Hirsheimer].
Put the egg whites into a clean mixing bowl and beat with a whisk until soft peaks form (this takes a bit of elbow grease, but it’s worth it). Use a rubber spatula to fold them into the batter. Please, for the love of god, don’t overwork the batter. Keep it light and fluffy.
Pour a little oil on a nonstick griddle or large skillet. Wipe out the oil with a paper towel, leaving only the thinnest film. Heat the griddle over medium or even medium-low heat [depends on your range] until hot. Pour about 1/4 cup of batter on the griddle. Cook until little holes appear on the surface and the cooked side of the pancake—go ahead and lift the edge to check!—is golden brown, about 1 minute on each side, if your griddle is at the proper temperature. Slather on the butter, a few good glugs of real maple syrup, and and a heap of freshly macerated and/or fresh berries if you have them on hand.
Devour.
{Makes about sixteen 4-inch pancakes.}
[adapted ever so slightly from Melissa Hamilton & Christopher Hirsheimer’s Canal House Cooking, No. 6, 2011]

fig. f: unholy mess
Keep your berry mixture simple.
Mix together whatever fresh, ripe, local berries you have on hand (as long as they’re nice and sweet—like raspberries, blueberries, black raspberries, red currants, and blackberries**). Depending on the amount of berries, stir in a tablespoon, or two (or three, or four…) of white sugar (the basic formula we use is about one tablespoon of sugar per cup of berries). Crush the berries a little as you stir the sugar in evenly, bruising them so that they release their juices more readily. Don’t overdo it with the sugar, but, if you’re going to sweeten them at all, don’t underdo it either. This berry mix should be an absolute joy to eat and it should produce a fair bit of beautiful berry syrup, too.
If you prefer, do a mixture of macerated berries and entirely fresh berries, like the combination of macerated raspberries and fresh blueberries you see in the accompanying photographs.
And if you’re a purist, go ahead and top your pancakes with the simple pleasures of fresh, raw, unsweetened berries. We won’t judge.
But, please, while berries are at their peak—as they are right now—insist on fresh, local berries if you can—preferably ones you harvested or foraged yourself.
aj
* We prefer Cabot Creamery sour cream whenever we can get our hands on it.
** Basically, you want to avoid things like gooseberries and blackcurrants, which are essentially inedible in their raw state (at least by humans).

Homemade rigatoni

Rigatoni pomodoro
And here’s how those rigatoni were made:

aj

Oat bread
aj


Dutch Baby Pancake with maple syrup and berries
aj

sansho pepper cabbage, soy-marinated eggs, salsa macha, Japanese chile crisp, Bellwoods Brewery Jelly King beer
aj

fig. a: Goodbye, 2019!
Sounds:
Mdou Moctar, Ilana, The Creator
Sample track: “Kamane Tarhanin”
Mdou Moctar @ Arts Riot, Burlington, VT, July 3, 2019
Lightning Dust, Spectre
Angel Olsen, All Mirrors
You Drive, s/t
Sample track: “Royal Blue”

Weyes Blood, Titanic Rising
Steve Gunn + Bill MacKay + Wildflower, @ Arts Riot, Burlington, VT, July 27, 2019
Steve Gunn, The Unseen in Between
Bill MacKay, Fountain Fire
Wildflower, Part One: Heavy Meadow
Townes Van Zandt, Flyin’ Shoes
Townes Van Zandt, Our Mother the Mountain
Lightnin’ Hopkins, California Mudslide (And Earthquake)
Ahmoudou Madassane, Zerzura (Original Soundtrack Recording)
Andy Shauf + Haley Heyndricks, Tralf Music Hall, Buffalo, NY, February 16, 2019
Haley Heyndricks, I Need to Start a Garden
Sample track: “Show Me a Body”
V/A, Wayfaring Strangers: Cosmic American Music
V/A, Heartworn Highways
Tinariwen, Amadjar
Nick Cave & the Bad Seeds, Ghosteen
Sample track: “Bright Horses”
Sharon Van Etten, Remind Me Tomorrow

V/A, Jambú: e os míticos sons da amazônia
Guy Clark, Old No. 1
Endless Boogie, Vol. I, II
Link Wray, Be What You Want to Be
Sample track: “Morning”
Link Wray & Mordicai Jones, Mordicai Jones
Michael Chapman, Fully Qualified Survivor
Dough Rollers, “Mansion on a Hill”
Lil Nas X, “Old Town Road”
Rob, Funky Rob Way
tribute to Rick & Levon, Woodstock, NY, July, 2019
Third Man Records, Nashville, TN
Neil Young, A Letter Home
Lee Hazlewood & Ann-Margret, The Cowboy & the Lady
Sample track: “It’s a Nice World to Visit (But Not to Live In)”
Moving Pictures:
Heartworn Highways (1976), dir. Szalapski
The Lighthouse (2019), dir. Eggers
The Farewell (2019), dir. Wang

The Souvenir (2019), dir. Hogg
BlacKKKlansman (2018), dir. Lee
The Favourite (2018), dir. Lanthimos
Pain & Glory (2019), dir. Almodovar
Les Blank: Always For Pleasure box set (2014)
The Reckless Moment (1949), dir. Ophüls @ The Aero Theatre, Santa Monica, CA
This is Not a Movie (2019), dir. Chang
Mind Hunter, season 2, created by David Fincher
Destroyer (2018), dir. Kusama
Widows (2018), dir. McQueen
Little Women (2019), dir. Gerwig
If Beale Street Could Talk (2018), dir. Jenkins

Rolling Thunder Revue: A Bob Dylan Story (2019), dir. Scorsese
Shoplifters (2018), dir. Kore-eda
Atlantique (2019), dir. Diop
Cold War (2018), dir. Pawlikowski
When They See Us (2019), dir. DuVernay
Roma (2018), dir. Cuarón @ The North Park Theatre, Buffalo, NY, February 17, 2019
“City Symphonies,” Anthology Film Archives, New York, NY, Jan-March, 2019
”Films For the Fair,” Anthology Film Archives, New York, NY, May, 2019
Salt Fat Acid Heat (2018), dir. Suh
Shampoo (1975), dir. Ashby + Hal (2018), dir. Scott
Halston (2019), dir. Tcheng
Missing (1982), dir. Costa-Gavras
Honeyland (2019), dir. Kotevska & Stefanov
Free Solo (2018), dir. Chin & Vasarhelyi
Still Walking (2008), dir. Kore-eda
Parasite (2019), dir. Bong
Hale County This Morning, This Evening (2018), dir. Ross
Food & Drink:
Gjusta, Los Angeles, CA
Arnold’s, Nashville, TN
Dear John’s, Los Angeles, CA
Bar Melusine, Seattle, WA
Mehuron’s, Waitsfield, VT
Canteen Creemee Co., Waitsfield, VT
Russ & Daughters Cafe, New York, NY
Toshi Sushi, Vancouver, BC
Folk, Nashville, CA

Louisiana Seafood Company, Nashville, TN + crawfish, shrimp, boudin and andouille feast @ J & H’s
Gjelina, Los Angeles, CA
Una Pizza Napoletana, New York, NY
Scarr’s, New York, NY
My Pie, New York, NY
Emmy Squared, Nashville, TN
pan pizza, Detroit-style @ home
Husk, Nashville, TN
Little Uncle, Seattle, WA
Night + Market Sahm, Los Angeles, CA
Bill Bar Tavern, East Aurora, NY
The Roots, Middlesex, VT
Brassneck Brewery, Vancouver, BC
Alambika, Montreal, QC
MTN, Los Angeles, CA
Jarr Bar, Seattle, WA
Frank Gourmet Hot Dogs, Buffalo, NY
Ramen Butcher, Vancouver, BC
Remedy House, Buffalo, NY
Vin on Rose, Los Angeles, CA
Sakai Bar, Toronto, ON
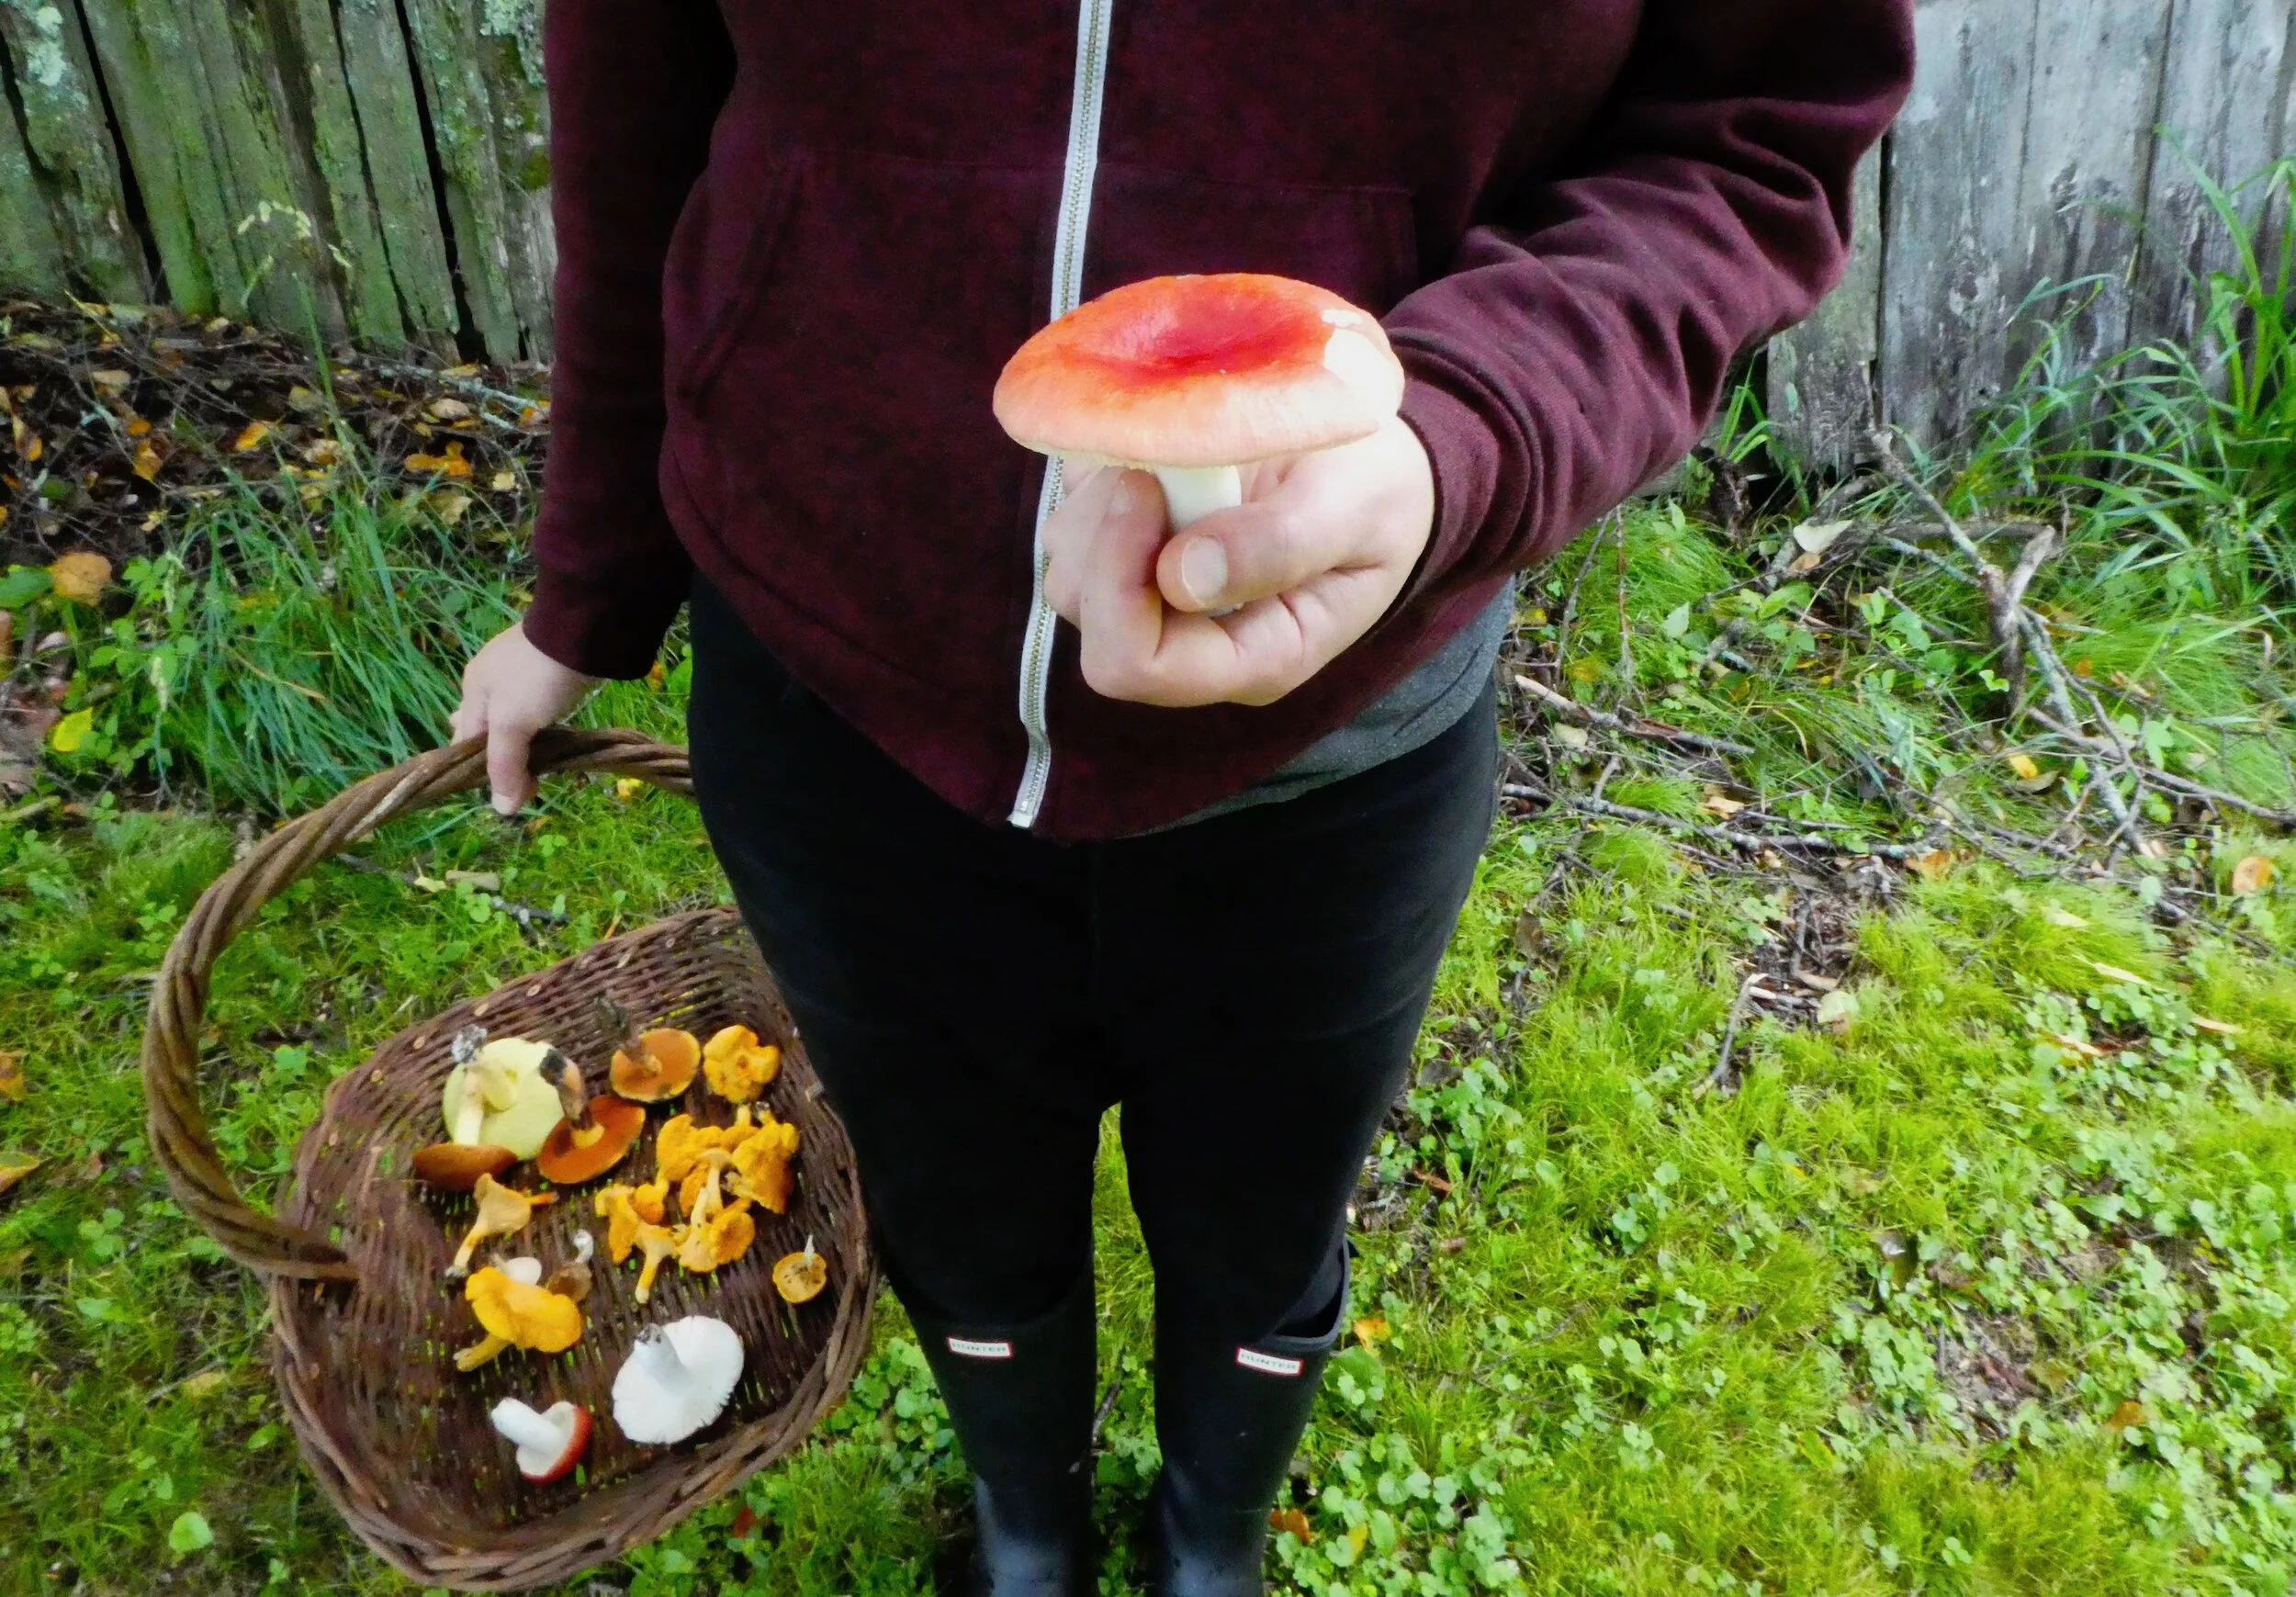

mushroom season, 2019
Falafel Yoni, Montreal, QC
Woodland Wine Merchant, Nashville, TN
Paradise Wine, Buffalo, NY
Empellon Al Pastor, New York, NY
Kiruki, Seattle, WA
The Win-Dow, Los Angeles, CA
Hen of the Wood, Waterbury, VT

Ronan Farrow, Catch and Kill: Lies, Spies, and a Conspiracy to Protect Predators
Michelle Alexander, The New Jim Crow: Mass Incarceration in the Age of Colorblindness
Margaret Atwood, The Handmaid’s Tale
Jane Mayer, “The Case of Al Franken,” The New Yorker, July 29, 2019
Joseph Conrad, Heart of Darkness
John Le Carré, “The Madness of Spies: A Secret Service Secret,” The New Yorker, September 29, 2008

Meredith Erickson, Alpine Cooking: Recipes and Stories From Europe’s Grand Mountaintops
Malcolm Gladwell, “Trust No One: Kim Philby and the Hazards of Mistrust,” The New Yorker, July 28, 2014
Barney Hoskyns, Small Town Talk: Bob Dylan, The Band, Van Morrison, Janis Joplin, Jimi Hendrix and Friends in the Wild Years of Woodstock
Sean Brock and Peter Frank Edwards, Heritage: Recipes and Stories
Greg Marley, Chanterelle Dreams, Amanita Nightmares: The Love, Lore and Mystique of Mushrooms
Nathaniel Philbrick, In the Heart of the Sea: The Tragedy of the Whaleship Essex
Adam Entous and Ronan Farrow, “Private Mossad for Hire,” The New Yorker, February 18 & 25, 2019
Peggy Barnard, Monkey in the House
Alberto Moravia, Contempt
David Arora, Mushrooms Demystified
Miscellany
Bread & Puppet Museum, Glover, VT
The Museum of Jurassic Technology, Los Angeles, CA
The Museum of Everyday Life, Glover, VT

The Country Music Hall of Fame and Museum + RCA Studio B, Nashville, TN
Hatch Show Print, Nashville, TN
Tenshin Juba ceramics show, Chariots on Fire, Venice, CA
Toiro, Los Angeles, CA
Nalata Nalata, New York, NY
New High Mart, Los Angeles, CA
Tortoise General Store, Los Angeles, CA

Allan Tannenbaum, “Punk/Rock,” D-Day, Woodstock, NY

Olivetti-Underwood typewriters
pottery class, A Third Space Pottery Studio, St. Catharines, ON

fig. b: Hello, 2020!
R.I.P.
Jonas Mekas
Agnès Varda
Robert Frank
Anna Karina
aj
Though it’s easy to get the impression these days that virtually everyone has gone back to embracing the joys of canning and preserving, in truth the reality is that very few North Americans ever purchase produce of any kind, let alone go through the trouble of canning. There are those that are tempted, though. They’ve read the articles, seen the television programs, listened to the podcasts, bought the cookbooks, and are very much inclined to can and preserve. One of the things that can hold a lot of potential canners back, however, has to do with quantity. Most recipes for canning and preserving are high-quantity. They’re geared toward stocking a pantry for a long winter, or for the apocalypse—whichever comes first.
Small-batch preserve recipes are what most novice canners need, though. They want to give it a shot, but they’re looking for something that’s not a huge undertaking. Something that doesn’t require a large capital investment. Something that pays dividends.
We discovered the pleasures of small-batch canning years ago, back around the time that we first started experimenting with touristic preserving, or small-batch canning as DIY souvenirs. We didn’t rely on a single set of instructions at the time. We just based our experiments on what we already knew about canning. After all, Michelle was already a pretty expert canner, and had been for some time. But we’ve always been struck by how little encouragement there is to can in small batches.
Recently, though, we discovered a particularly sublime small-batch jelly recipe, in Nigel Slater’s Tender, vol. 2. This shouldn’t have been a surprise. Slater is exactly the kind of food writer who you’d expect to have written such a treatise, given his devotion to fruits and vegetables and his fine-tuned attention to seasonality and to the pleasures of the garden. He’s also someone who never expected to become a serious canner, which may partially explain his openness to all different approaches to preserving. “I find it slightly amusing that I am now the sort of person who makes jellies and jams,” he writes. “The process is relaxing and somehow good for my wellbeing. Twenty years ago I would have laughed at the idea of ever pouring cottage garden fruit through a jelly bag, let alone labelling my own jars of jam. Getting older isn’t all bad.”*

fig. a: high summer berries
Michelle had picked a beautiful mix of berries from our garden—redcurrants, raspberries, and blueberries—and was looking for inspiration. When she came across Slater’s recipe it struck her as especially well-suited for her needs, even if it was rather unconventional: he recommended virtually no liquid, and his cooking time was very, very short. But most importantly, Slater brought his berry mixture to gel stage before passing it through his jelly bag. She had her doubts, but she decided to follow the instructions closely, and Slater’s recipe ended up putting her apprehensions to shame. The results were truly exceptional: the finest, loveliest jelly she’d made in quite a while, and one that required a minimum of effort.

fig. b: still life with quivering jelly
It did require a tiny bit of equipment, however: a nice, deep stainless steel pan to cook the fruit in, a jelly bag, and some jars.

fig. c: Nigel’s jelly bag
But with its simple method, the small amount of fruit it requires, and its easily adaptable equal-parts-fruit-and-sugar formula, this is a recipe that makes preserving high summer berries as easy and as satisfying as possible. See a beautiful bunch of berries at the farmers’ market? Pick them up. Have some in your garden? Gather a few handfuls. Know some friends who happen to have a bumper crop? Unburden them.
Here are the essentials of Slater’s recipe, including its wonderful, somewhat poetic, but very appropriate title:
A Quivering Jelly
450 g redcurrants
A small handful of blackcurrants
450 g white sugar
Put the berries, still clinging to their stalks, into your nice, deep stainless steel pan. Pour in the tiniest amount of water, barely enough to cover the bottom of the pot, then add the sugar. Place on the stove over medium to medium-high heat, depending on the strength of your flame/element. Gently bring to a boil, stirring from time to time, and boil for eight minutes, and eight minutes only—“no longer or the flavour will spoil,” according to Slater. Pour the mixture through a jelly bag set over a wide jug or bowl. Let it be until all the juice has dripped through. Resist the urge to press the fruit in order to produce more juice. Doing so “will cloud the jelly,” Slater points out, spoiling its breathtaking translucency.
Pour into clean jars you have sterilized with boiling water from the kettle and dried, preferably in the oven. Can using sterilized lids, or follow Slater’s instructions by cutting discs of greaseproof paper to fit over the preserve, then covering tightly with a screw-top lid, before storing the jars “in a cool, dry place.”
Of course one of the major advantages of small-batch preserving is that you don’t really have to go through the trouble of canning at all. Put it in any kind of clean container you like. Keep it the fridge. Eat it now. Enjoy it in the moment.
This jelly is so utterly perfect, it won’t last long.
aj
*Ain’t that the truth?

fig. a: That Nashville Style
Yes, a number of these tracks were recorded in Nashville by artists who actually lived in Nashville and/or environs for significant lengths of time. In other cases, they were recorded by artists who spent fleeting time in Nashville, but were inspired by its music scene. In still others, they’re tracks that were recorded in other parts of the States, but got channeled through Nashville because of its central role in the North American music industry. Then there were songs that I heard during a remarkable trip to Nashville in April of this year, or ones that I picked up on that trip. Whatever the case, this is a mix that came together soon after I got back from Nashville, and while very, very few of these songs are true examples of “the Nashville sound,” together they go a long way toward conjuring that magical time in that magical place for me. A Nashville of the Mind.
If you happen to be in Nashville sometime soon, by all means visit the Country Music Hall of Fame (after all, ‘round there, “Honor Thy Music” is taken pretty seriously), and, when you do, check out “Outlaws & Armadillos: Country’s Roaring ‘70s” and “Emmylou Harris: Songbird’s Flight”, both of which are pretty astounding if you’re as big on “outlaw” country-folk and country-rock of the ‘60s and ‘70s, and the LA-Austin-Houston-Nashville connection that was so crucial to it, as we are.
If you’re not going to Nashville anytime soon, but you share our devotion to that “outlaw” scene and you haven’t yet had the pleasure of seeing James Szalapski’s Heartworn Highways (1981), don’t hesitate. Now is the time. Honor Thy Music.
aj
