Out of the Archives: "Last-minute, High-temperature Thanksgiving, or Thank you, Mr. Steingarten" (2007)


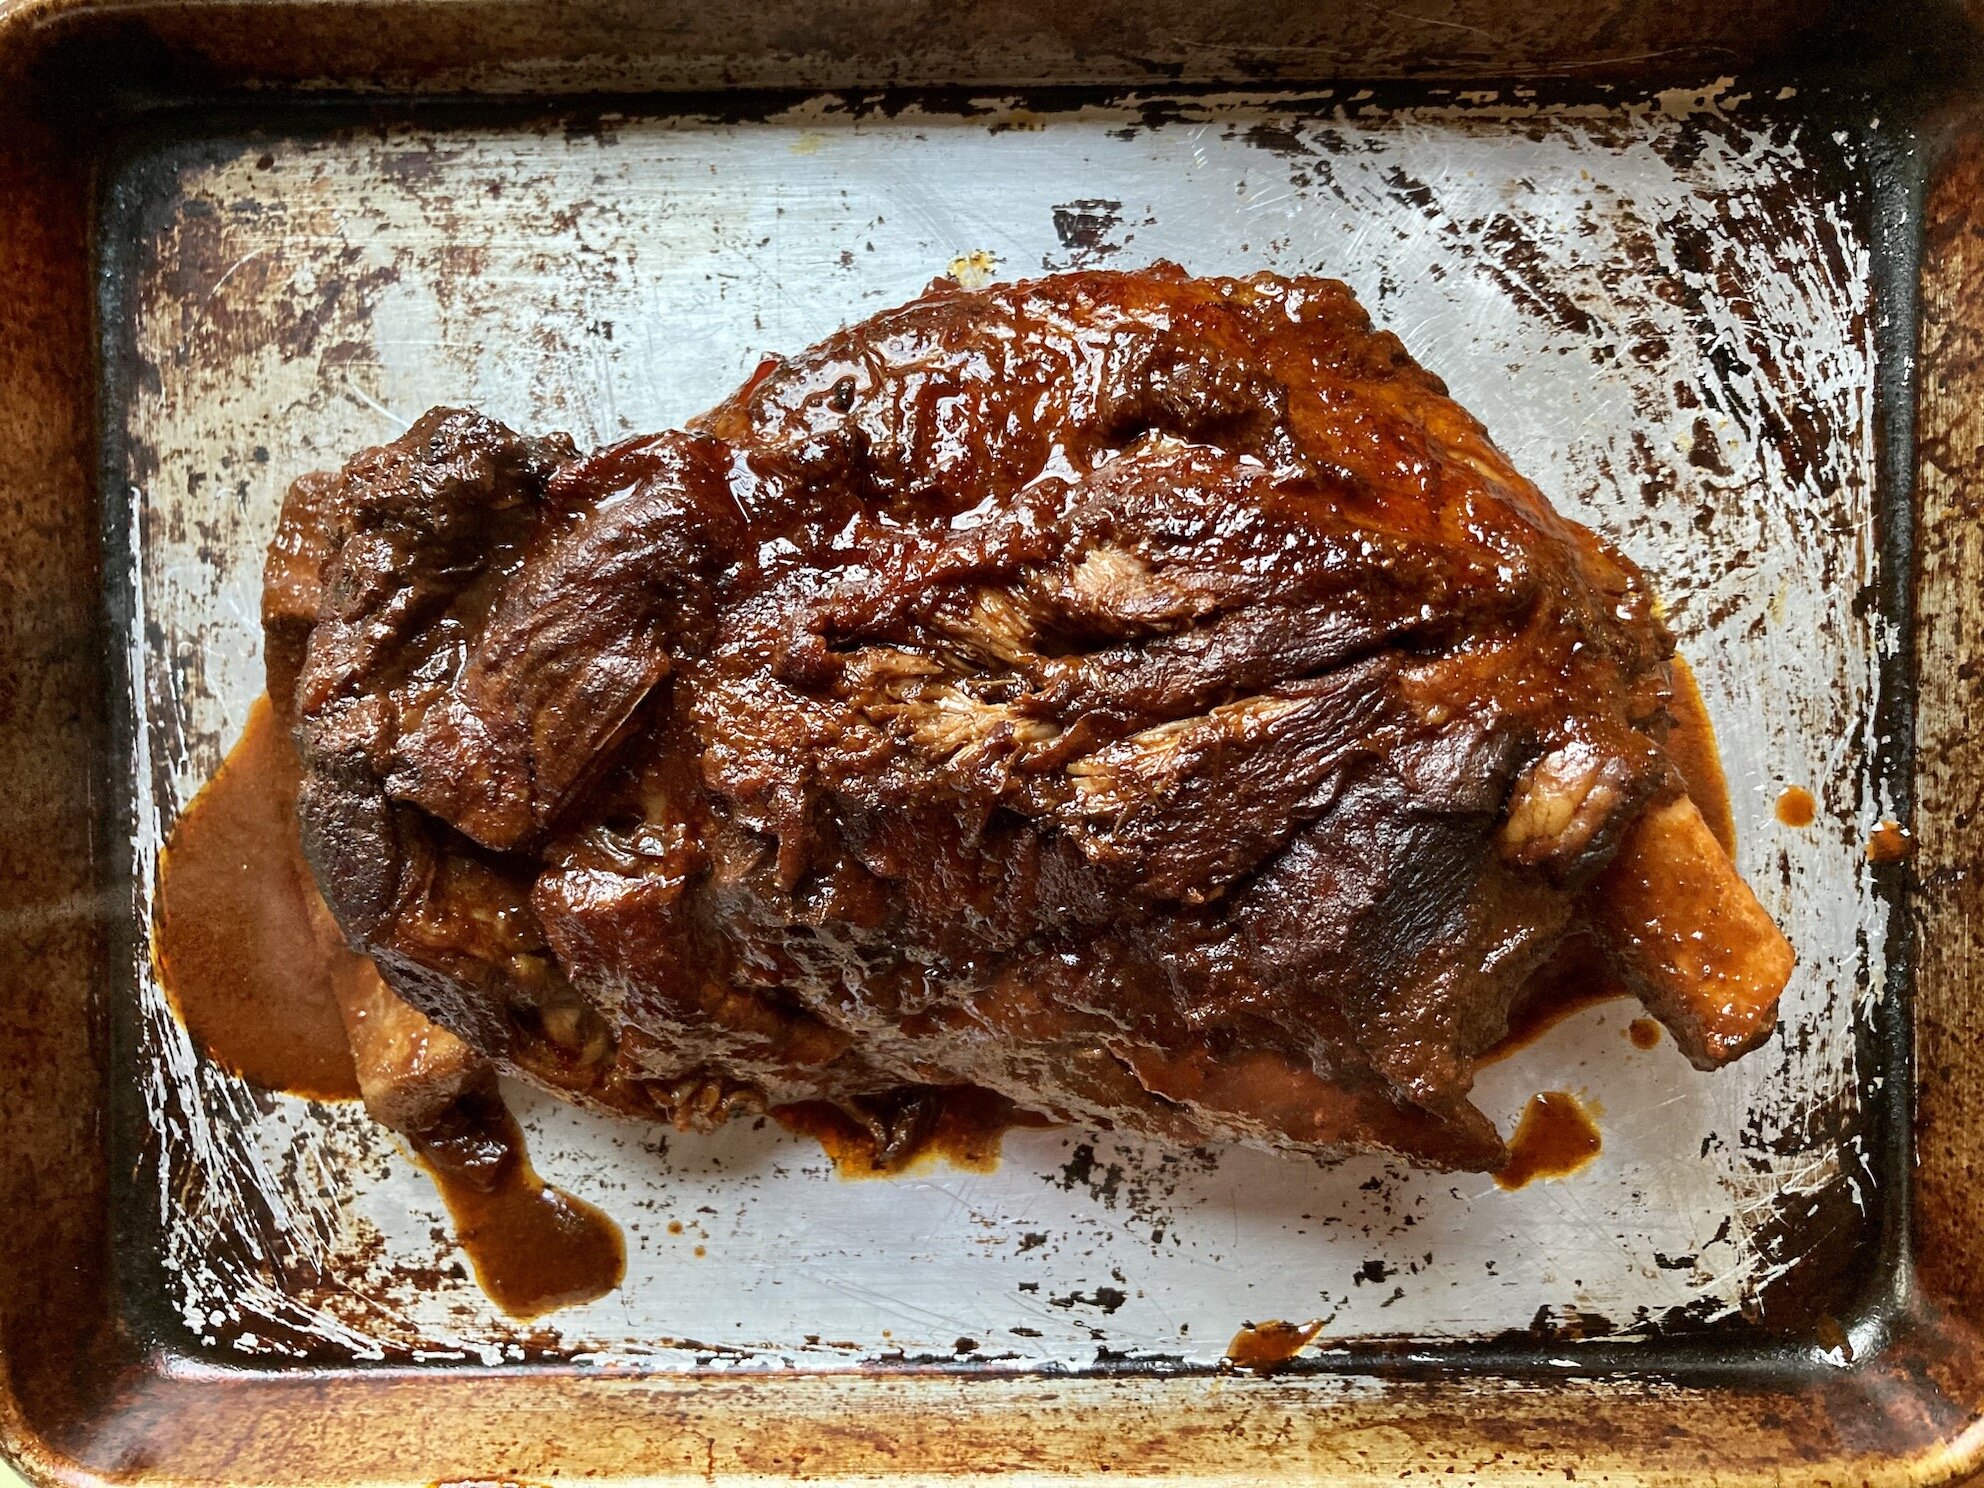
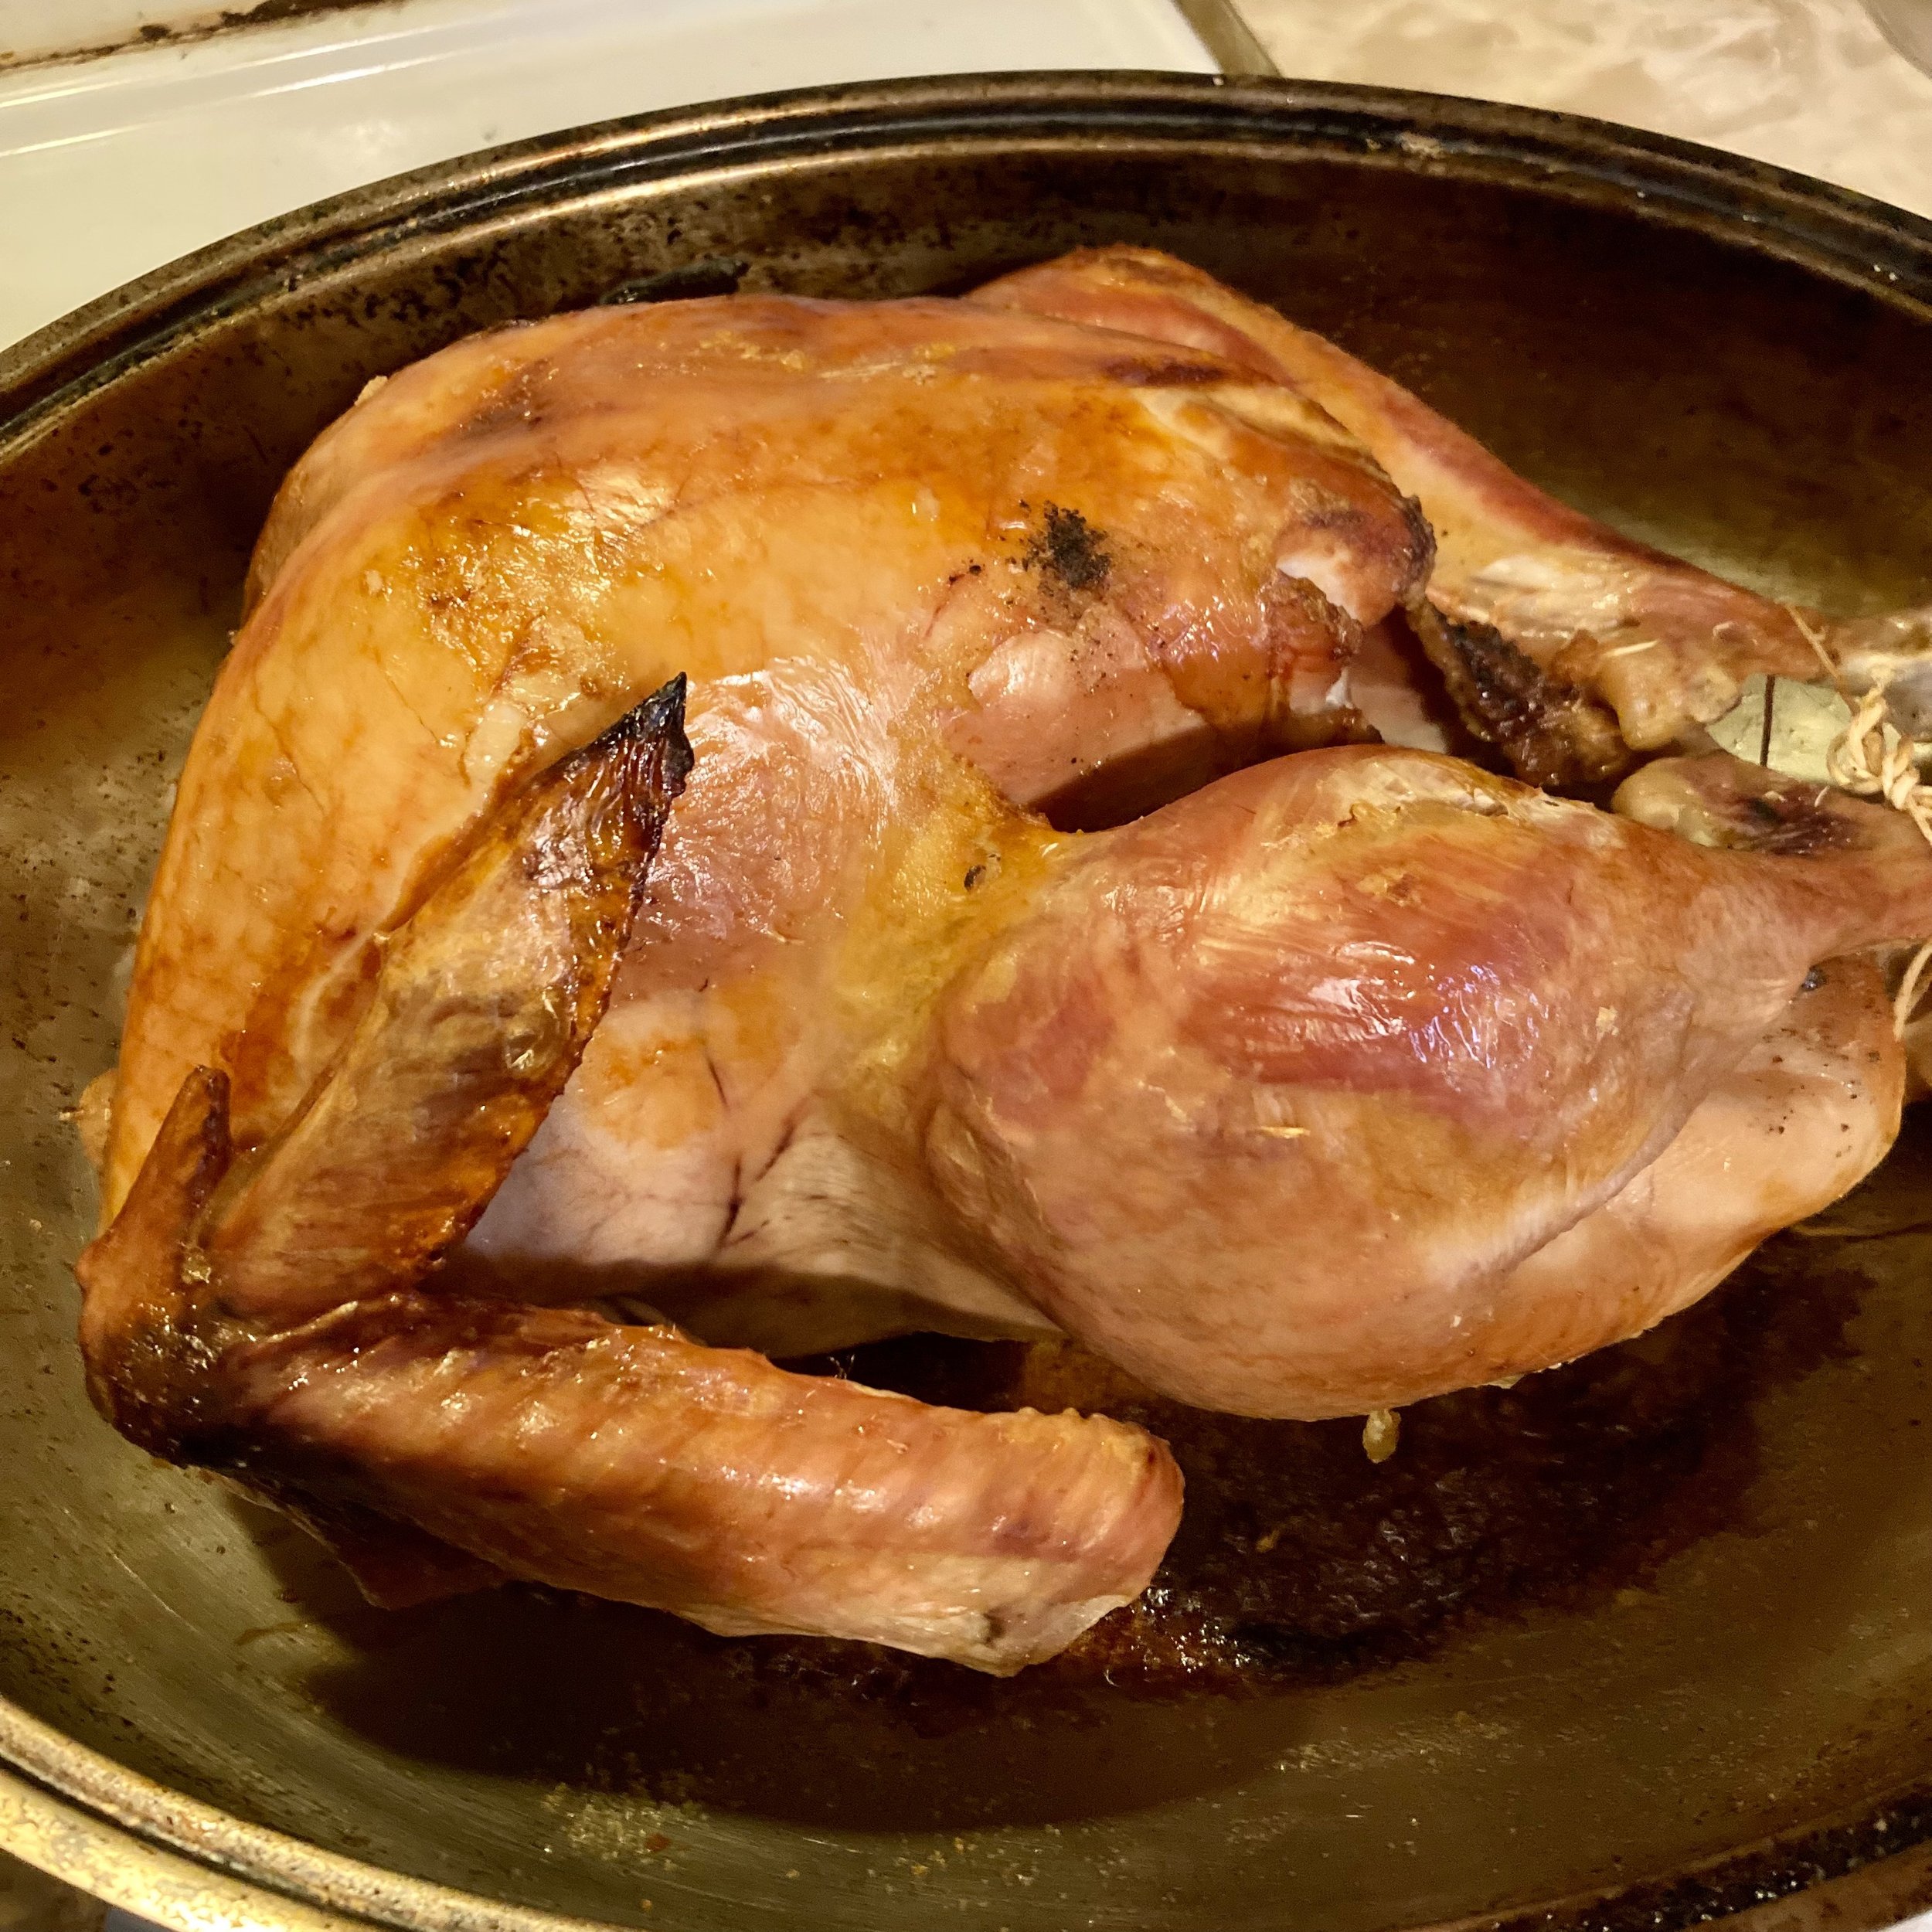
Fig. a: High-Temperature Turkey, 2023 Edition

This post first appeared in November 2007, right before American Thanksgiving, in advance of the annual expats’ Thanksgiving dinner we held in Montreal for years. Jeffrey Steingarten’s High-Temperature Turkey (which he learned from Barbara Kafka) is still the method we turn to virtually every time we roast a turkey. It has never let us down.

Do you love turkey dinners as much as we do? Are you unfamiliar with the fabled High-Temperature Turkey? Read on!

—————

For those about to roast...

You know the nightmare. It goes something like this: It's mid-afternoon on an autumn weekday and for some strange reason you have the day off. You've been going about your happy-go-lucky business, doing all sorts of pleasant autumnal things, and generally enjoying yourself when suddenly you're seized with panic. Your eyes zoom in on your watch and it reads 3:00 PM. You whip your head around to take a look at the calendar that's just materialized on a wall next to you, check today's date, and, sure enough, it reads THANKSGIVING DAY. Only then do you suddenly remember that this year you happened to send out invitations for a Thanksgiving dinner at your place and in a matter of hours 12 hungry people will be turning up on your doorstep fully expecting a big, beautiful roast turkey dinner with all the fixings. You race to your bookshelf and grab a book entitled Cookbook, flip it open to the "Roast Turkey" recipe and, you guessed it, the recipe reads: "Preheat your oven to 325º... Roast your turkey 12-15 minutes per pound..." Not only do you not have the time to roast that 24-lb Butterball, you haven't even bought it yet! You look around you and somehow you've been transported to some barren post-industrial wasteland. You tilt your head back, stare deep into the sky, and yell "NO!!" at top volume. You wake up in a cold sweat.

Okay, maybe your particular version of this nightmare isn't quite as dramatic as this, but you get the point. Well, we're here to tell you that we know the feeling and there's hope.

Flashback a little over a month ago to October 8th, a.k.a. Canadian Thanksgiving 2007. As many of you know, we're big on Thanksgiving here at "...an endless banquet." So much so that we happily celebrate Thanksgiving (at least) twice every year. This year, however, Canadian Thanksgiving caught us a little off-guard. For some reason we hadn't gone through the usual 2-weeks' worth of deliberations concerning menu, ingredients, and approach. In fact, we were caught so off-guard that it was literally 3:00 pm when Michelle decided that we absolutely, positively could not let Canadian Thanksgiving slip by without a traditional feast. She got on the horn, rounded up a few last-minute guests, and then and only then did she get on her bike and head towards the market. By 4:30 pm she was back at home with a lovely 15-pound turkey in tow. By 5:00 pm the turkey was in the oven. And by 7:00 pm the turkey was out of the oven, resting, just minutes from getting carved and served. Our guests arrived, we sat them down and served them drinks, and by 7:30 pm we were digging in to one of the very best turkey dinners in either of our personal histories. Yes, you read that correctly: the turkey was ready in two hours (!) and it was delicious.

No trickery was used, no special tools were required, and, no, we didn't microwave our turkey. We used a regular turkey and a regular oven. We did, however, rely on some high-powered expertise. You see, it was Barbara Kafka's High-Temperature Turkey recipe* as featured in Jeffrey Steingarten's The Man Who Ate Everything, And Other Gastronomic Feats, Disputes, and Pleasurable Pursuits that allowed Michelle and I to be so remarkably cavalier about our Thanksgiving dinner.** The low-down: you get yourself a 12 to 15-lb turkey (any bigger and it'll take up too much room in your oven and get scorched), you crank up your oven to its highest setting (550º), and you never baste it. That's right: you don't baste your turkey either. All you have to do is jiggle every now and again. Sounds insane, we know, but it works. We expected crazy amounts of smoke and frankly we were willing to pay that price in order to have our turkey fully roasted and ready to go in two hours, but somehow our kitchen remained perfectly smoke-free and guest-ready throughout. Nothing short of miraculous.

High-Temperature Turkey

one 15-pound *** turkey at room temperature
salt and pepper
2 onions, halved

Preheat the oven to its highest setting.**** Place the turkey in a large roasting pan, salt and pepper the interior cavity and stuff the onions inside. Place the turkey in the oven and bake for 15 min. Remove the turkey from the oven, and with a wooden spoon or some tongs jiggle the turkey loose from the bottom of the pan. Return the turkey to the oven and repeat this jiggling every 20 min. A 15-pound bird will take just under 2 hours.***** (Ours took 1 hour 50 min.) You want the thigh meat to be between 175 and 180°F. If you have a smaller oven, you may have to cover the bird with a piece of aluminum foil in the late stages of the high-temperature roasting in order to protect it from getting overly blackened, but we didn't. Let the turkey rest at least 10 min. before carving it. The skin will be an amazing auburn colour and it will crackle as you carve it. Inside, the meat will be as juicy as you've ever seen, white and dark alike. Unbelievable. Miraculous even. Plus, you'll find a goodly amount of juices at the bottome of the roasting pan which you can use to make a fittingly phenomenal gravy.

Feeds four ravenous, Thanksgiving-crazed people, and provides them with plenty of mind-blowingly delicious leftovers.


Happy American Thanksgiving!

am/km

* No, Smartypants, this isn't a recipe for giving a turkey a fever.

** Despite its origins, this recipe is the opposite of Kafkaesque. It is as simple and straightforward as they come.

*** Again, turkeys that are any bigger will not work for this method. If you need more turkey, cook two smaller birds.

**** Note that this high temperature will make baking side dishes impossible alongside the turkey. I made the stuffing before, covered it with foil and baked it 30 min. Once the turkey was done, I lowered the oven temperature and returned the stuffing to the oven until it was hot, baking it uncovered for the last few minutes to crisp the top.

***** Here are cooking times for turkeys of other sizes: 9-10 lbs.=1 hour 15 min., 12 lbs.=1 hour 20 min., 20 lbs.=about 3 hrs.

—————

Speaking of miracles. The last time we used the High-Temperature Turkey method was just this past Sunday, for Canadian Thanksgiving 2023. When we’d pulled the turkey out of the oven, and checked its internal temperature (perfect!), we stepped outside onto the balcony of our Montreal apartment, and this is what we saw:

Fig. b: Thank you, Mr. Steingarten!

We took this to be a good omen. We hauled our 12-lb turkey, our deluxe stuffing, and our roasted carrot dish up to our friends’ place in Little Italy and gave thanks.

aj

Out of the Archives: "Hungarian Kick" (2007)


This post first appeared in 2007. I guess that means it is celebrating its 15th anniversary. As you’ll see, it was prompted by the seasonal arrival of locally grown sweet and hot peppers of all kinds in Montreal’s markets—especially Jean-Talon. But there’s an unexpected soccer theme to it. I didn’t remember that aspect of this post, but its presence is somewhat ironic because the last time I made this dish was December 18, 2022, the day of the World Cup Final in Qatar.

This recipe has been a staple of our repertoire for at least fifteen years. It’s one of a handful of dishes that is guaranteed to drive Michelle crazy. You know, the kind of dish you literally can’t stop eating. This is one of those for her. It’s a dish she requests often. I prepared it for the night of December 18 because that was the day of Michelle’s 3001: A Cookie Odyssey/Christmas Market event, and that’s the way Michelle wanted to celebrate the occasion. She thought it would be a fitting way to close out the market’s Eastern European theme. She was right.

Did the idea to make Hungarian goulash this past week come from a recent re-viewing of R.W. Fassbinder's The Marriage of Maria Braun? Yes, the film integrates the utter hysteria that surrounded Germany's 3-2 victory over Hungary in the 1954 World Cup final seamlessly into its explosive finale, and, yes, I have been on a real Hungarian kick suddenly, making three Hungarian meals since watching Fassbinder's masterpiece of melodrama, but, c'mon... Truth is, the inspiration behind that goulash had a lot more to do with the current availability of peppers--fresh sweet and hot peppers from Jean-Talon Market, and dried peppers from Olives et Épices, also at the market. The dried peppers--whole Hungarian smoked hot peppers--we'd gotten a while back, and as soon as we gave them a whiff, we turned to each other, gave each other a couple of knowing looks, and uttered the word "goulash" in unison. The fresh peppers in question were Hungarian banana peppers and Hungarian sweet peppers from Birri. As soon as they came into season, I started thinking about all those pepper-heavy Eastern European dishes that I love, like Paprika Chicken, Slovak eggs, Bab Leves, and, yes, Hungarian goulash.

I turned to a recipe for gulyás from Saveur, where, unlike the dish that's come to be known as "Hungarian goulash" in North America, the consistency is more along the lines of a "soup that eats like a meal." The recipe seemed authentic and all--though it does include tomatoes, which some gulyás devotees strictly avoid--so I used it as a blueprint, but I made a few significant changes. First off, I was more in the mood for a stew than a soup (even one "that eats like a meal"), so I cut back on the broth and aimed for a thicker, more stew-like consistency, a somewhat authentic take on the bastardized North American version I grew up with (the kind that tends to get served in the presence of strolling violins). Secondly, inspired by the idea of those Hungarian cowpokes making their gulyásover an open fire, I decided to make an iittala casserole-bound version that could be cooked over an open fire, if you're the kind of ranch hand who takes Finnish designer cookware out on the range, or in our fireplace, if only we had one. Lastly, I left the potatoes out. And then I put them back in (you'll see what I'm talking about momentarily). But mostly I balked when it came to the potatoes. And I'm not 100% sure why. I told myself it was because I knew there was going to be enough to freeze, and sometimes potatoes don't freeze so well, but I never really found that line all that convincing.

So, this particular goulash might not win prizes for authenticity, but, as we all know, authenticity has its limits. The bottom line was that it was delicious--the cubed beef had turned to candy, and it had a deep, rich broth that was utterly irresistible (you know: the kind of dish that you just can't stop yourself from having one more bowl of, even when you're officially "full"). I was downright enthusiastic about my bowl. "This might just be the best goulash I've ever had," I remember thinking.* Then I went back and had three or four more helpings just to be sure. Michelle didn't have her bowl of goulash until she got off from work later that night and I assembled her late-night snack. Now, granted, she hadn't eaten in 12 hours, she'd just come back from a tough shift, and she was maybe just a little delirious, but she wasn't two or three heaping spoonfuls in before she turned to me, earnestly, and exclaimed, "This is my favorite meal ever." Like I said: she was a little delirious. But I knew what she was talking about. That pseudo-Hungarian goulash absolutely hit the spot. It's certainly well worth tracking down smoked hot Hungarian peppers and fresh Hungarian sweet and hot peppers for.

fig. a: Goulash with roasted potatoes

Goulash à la AEB (2022 version)

2 strips of thick-cut bacon
1-2 tbsp vegetable oil
2 yellow onions, peeled and chopped
2 1/2 lbs beef chuck, cut into 2" cubes
1 carrot, peeled, and coarsely chopped
1/2 tsp caraway seeds
3 cloves garlic
Salt and freshly ground black pepper
2 tbsp sweet high-quality Hungarian paprika
1 rounded teaspoon ground smoked Hungarian hot peppers (optional, although you could use a high-quality smoked Mexican chile in its place if those are more readily available--either way, this touch really gives the goulash depth, it also gives it an unexpected, well, kick)
4 cups beef stock, warm
1 medium tomato, peeled, seeded, and coarsely chopped (optional if you're one of those that believes that tomatoes have about as much place in a gulyás as they do in a chili)
3-4 fresh Hungarian sweet peppers
1-2 fresh Hungarian hot peppers

In a large Dutch oven, fry the bacon strips, rendering their fat. Remove the bacon, and dice the strips. Reserve. Add 1-2 tbsp vegetable oil, bringing your total amount of fat in your pot to 2 tbsp (or just over), and heat over medium heat. Brown the beef cubes on all sides, making sure to get a nice sear on them. Turn up the heat slightly if you need to in order to brown the meat properly. Remove the meat from the Dutch oven, placing it in a large bowl.

Preheat your oven to 300º F.

Lower the heat to medium-low, add the onions to the Dutch oven and cook, stirring occasionally, until soft, about 15-20 minutes. Add the carrots, the fresh peppers (both sweet and hot), and the reserved bacon, and continue to cook, stirring occasionally, until the peppers have softened, about 10-15 minutes.

Meanwhile, toast the caraway seeds in a small skillet over low heat until fragrant, about 1 minute. Crush the toasted caraway seeds in a mortar, add the garlic and the salt and crush some more until you have a paste [everyone knows about goulash and paprika, but this combination of garlic, caraway, and salt is just as essential]. Remove the pot from the heat, add the garlic/caraway paste, the paprika, and the smoked Hungarian hot pepper to the onion/carrot/pepper concoction and stir well.

Add the browned meat and stir well. Add the stock to the beef mixture, stir, and transfer to an oven-ready casserole. Add the tomatoes (if using), stir, and cover. Put the casserole in the oven. Bake for 1/2 hour at 300º F, then lower the heat to 250º and bake for another 2-3 hours.**

While the goulash is simmering to perfection in the oven, giving off the most other-worldly aroma, roast some potatoes, if you’re the kind of person who prefers potatoes with your goulash.

If you’re the kind of person who prefers spätzle, plan accordingly.

If, however, you’re happy to serve your goulash with egg noodles, relax.

When the goulash has finished simmering to perfection, season to even greater perfection with the salt and freshly ground black pepper.

If you’re serving your goulash with potatoes, place a spoonful of roasted spuds and ladle the goulash overtop.

If you’re serving your goulash with spätzle, spoon the goulash over a bed of spätzle.

If you’re serving your goulash with egg noodles, ladle the goulash over a bed of noodles.

In all three cases, I recommend topping off the goulash with a small dollop of sour cream.

Usually serves 4-6 hungry souls. I say “usually,” because it really depends who you serve it to. Michelle isn’t the only one who gets driven crazy by this goulash. I’ve seen perfectly civilized people go back for fourth and fifth helpings. You’ve been warned.

NOTE: Goulash often tastes even better on Day 2. I wouldn't necessarily recommend making it a day in advance, because, personally, I wouldn't be able to restrain myself, but, if at all possible, try and keep some as leftovers for lunch or dinner the next day. You'll be happy you did.

[adapted from a recipe in Saveur's "Food for the Holidays" Winter 2004 special issue]

It's a Disgrace

When we were kids, my sister and I were fans of Tomie dePaola’s Strega Nona. Who wasn’t back then? Back in the freewheelin’ '70s. Back before the conservative movement had launched its Inquisition to purge children’s literature of anything that might not be in step with its radical Christian fundamentalism. Back before even Strega Nona came under scrutiny. The book had just won a Caldecott Medal and had quickly become a beloved classic of children’s libraries across America. Of course, I had extra reason to be on board—Strega Nona’s assistant was a guy who went by the name of Big Anthony. Cool handle, right?

fig. a: Nona & Tony

Anyway, recently I found myself thinking about good ole Strega Nona and her witchy ways again for the first time in ages when I came across a tantalizing, revelatory recipe. Why Strega Nona?

fig. b: Nona knows best

Well, it had something to do with the fact that it was a pasta dish that came with a “colourful” Southern Italian name, not unlike Strega Nona (basically “Grandma Witch”). Plus, you don’t need spells or a magic pasta pot to make it, but the dish is rather magical.

The recipe in question was for Rigatoni alla Disgraziata—”the poor wretch’s rigatoni.” (You’ll notice that, as they always are, this pasta dish is gendered feminine, so the “poor wretch” in question is a woman. That didn’t stop me from identifying with her. I mean, Big Anthony didn’t have any hesitations about hanging out with Strega Nona, did he?) The dish is a classic of the Sicilian repertoire, but I’d be surprised if variations aren’t also found in other parts of Southern Italy (like Calabria, Strega Nona’s home region), because it’s basically a simple, honest, and satisfying eggplant pasta dish, a “peasant’s dish,” a prime example of cucina povera. This particular version involves some cheese, but the breadcrumbs that are essential to its preparation would often be used as a substitute for cheese in poorer households. The two vegetables necessary to make the dish are eggplant and tomatoes, staples that virtually every Sicilian family would have had on hand (or would have easily been able to access, one way or another).

fig. c: eggplant & tomatoes

Use the best eggplants and tomatoes you can find—preferably out of your own garden—but the bottom line is this is cucina povera—the cuisine of the poor and of the frugal—use what you have. In my case, I found some gorgeous organic eggplant at the market, but I wasn’t so lucky with tomatoes, so I made do with canned ones.

And while the recipe that I used as a model was for rigatoni, I substituted in busiata instead, because that’s what I had on hand, because they hail from Sicily (Trapani and environs in Western Siciliy, to be specific, where they’re often used to make Busiate alla Trapanese), and because their worm-like shape seemed appropriate to the dish in question (and ideal for the lead-up to Hallowe’en).

figs. d & e: Busiata di Sicilia

My source was a beaten-up old copy of Saveur Cooks Authentic Italian (2001), from the heyday of the beloved magazine. It’s amazing what turns up again when you move, as I did recently, and it’s amazing how well a good cookbook (just like a good children’s book) stands the test of time. Now that my knowledge of Italian cuisine has expanded, now that I’ve spent a little bit more time in Italy, this collection of recipes seems even more vital than it did in the early 2000s. Its cucina povera game was always strong, however, something which was a distinct bonus back when I was a graduate student and which always endeared me to it. Why I’d never tried making Rigatoni alla Disgraziata is a mystery to me.

The technique that’s featured here and that I found “revelatory” is a simple one for preparing eggplant. Eggplant is famously difficult for so many home cooks who don’t come from a tradition of preparing, consuming, and enjoying eggplant. Sure, you’ve read that certain eggplant dishes are considered the pinnacle of vegetable cookery throughout the the Mediterranean region and beyond, but the issue of even choosing nice eggplants can be daunting for many, let alone transforming them into something majestic. And god knows improperly cooked eggplant is a horror.

In this case, I started with Japanese-style eggplants, which are often a safer bet than larger globe eggplants because they’re less seedy and they cook up quicker. The fact that these were local and organic and that I had great faith in the farm that raised them made them an even better bet.

Cubing the eggplants, generously salting and tossing the cubes in a colander, and allowing them to “sweat” for an hour or so is a standard method for removing the bitterness of untreated eggplant. Many recipes that involve Japanese eggplant don’t call for this step, but you still may want to go this route just to be sure (I did).

But the genius of the recipe has to do with pan-frying the eggplant in a generous amount of olive oil before it gets anywhere near a sauce. The idea is to transform the cubes into golden little jewels of flavour that are lightly crispy on the outside and positively melty inside. By the time this step is completed, the eggplant is already delicious, but it’s ready to become even more so when tossed with your sauce, your pasta, and your cheese.

This technique is useful in a wide range of contexts and recipes. For instance, Michelle has been using a variation on this technique (she chops the eggplants differently and cooks them in a different type of oil) for some of her Japanese dishes for years. Like I said, once you’ve prepared the eggplant in this manner and seasoned them, they’re already delicious, anything else you do to them is extra.

But in this case, the eggplant formed the basis of a rustic pasta dish:

Busiate alla Disgraziata

3-5 small Japanese eggplants, or 2 medium globe eggplants, trimmed and cut into cubes

Kosher salt

1/2 cup plus 2 tbsp extra-virgin olive oil

1 cup fresh bread crumbs

1 lb busiata or rigatoni

1/4 tsp red pepper flakes

2 cups tomato sauce, preferably homemade

1/4 cup grated pecorino or ricotta salata

freshly grated Pamegiano-Reggiano

Put the eggplant in a colander, sprinkle liberally with salt, and toss to coat well. Allow to drain for 1 hour to “sweat” and extract bitterness. Rinse the eggplant and pat dry with a clean kitchen towel or paper towel.

Heat 2 tbsp of olive oil in a large, heavy skillet (I used a 10” cast-iron one) over medium-high heat. Add bread crumbs and cook, stirring, until golden, about 2-3 minutes. Transfer to a bowl and set aside.

Wipe out the skillet with paper towel, add remaining 1/2 cup* olive oil, and re-heat over medium-high heat. Add half the eggplant and cook, stirring and flipping the cubes often, until golden, 8-10 minutes. Transfer eggplant with a slotted spoon to a large bowl and season to taste with salt. Repeat process with remaining eggplant.

Cook past in a large pot of boiling generously salted water until al dente. Add red pepper flakes to tomato sauce in a small pot and warm over medium heat, 4-5 minutes. Drain pasta in a colander and add to bowl with eggplant. Add tomato sauce, pecorino or ricotta salata, and bread crumbs and toss well.

Serve sprinkled with Parmigiano Reggiano, accompanied with a glass of red wine, some chili oil, and a green salad.

[Based very closely on a recipe from Saveur Cooks Authentic Italian (2001), by the Editors of Saveur Magazine]

The final product should look something like this:

fig. f: Busiate alla Disgraziata

I found it deeply satisfying, perfect for the late harvest season, and not a disgrace in the least. Quite the contrary. To me it’s quite beautiful, and I wish I had a magic pasta pot that was capable of producing vast quantities of this utterly delicious dish. But even more important is the magical transformation that is at the heart of this recipe, and that blesses it with heart. Like all great cucina povera—like all great “peasant food,” in general—it’s a dish that glories in creating “something” out of “nothing”—something wonderful.

Big Anthony

  • Note: the original recipe calls for 1 cup of olive oil. If you’re using an even larger skillet, you may need to use more olive oil than I did—up to 1 cup. But for a 10” skillet, I found 1/2 cup was ideal.

Birria Hysteria

fig. a:  the low rider is a little higher

fig. a: the low rider is a little higher

fig. b:  Californi-vacation

fig. b: Californi-vacation

fig. c:  sunset kingdom

fig. c: sunset kingdom

fig. d:  moonrise kingdom

fig. d: moonrise kingdom

The trip we took to Los Angeles in December of 2019 has taken on greater and greater significance over time.

For one thing, and perhaps most importantly, that was the last real trip we took before everything took a dramatic (and traumatic) turn early in 2020.

For another, that was when our love affair with birria began in earnest.

I’d been following the development of birria hysteria south of the border for a few years now.

fig. e:  “How birria tacos conquered America”

fig. e: “How birria tacos conquered America”

I’d read about birria establishments in Tijuana, Chicago, Los Angeles, Houston, New York, Richmond, CA, and elsewhere. iIn some ways my fascination with birria mirrored my fascination with barbacoa. In both cases, full-blown culinary explosions were taking place all across the U.S., inspiring passionate, even ecstatic, followings. In both cases, these were not trends that had made their way north of the border in any appreciable manner. Of course, it’s just a matter of time. In fact, the process is already underway.

Los Angeles had become the epicentre of the “birria boom” according to most accounts. Proximity to Tijuana, sheer range of regional Mexican regional cuisines represented (and thus varieties of birria), and dedication to Instagram and TikTok were all factors behind this phenomenon. And we were staying in Venice, in close proximity to an outpost of one of the superstars of L.A.’s birria scene: Teddy’s Red Tacos.

This is how quickly things have happened: Though birria’s roots in Tijuana date back to the 1950s, when a Poblano native imported a dish from his home region and adapted it to local tastes (and cost efficiencies), it remained a minor culinary development there as late as the mid-1980s, when one Teddy Vasquez was born. By the early 2000s, birria had gained in popularity quite significantly in Tijuana, but one stand in particular, Tacos Aarón, dominated the scene. And it wasn’t until 2015—just over five years ago—that Teddy returned to Tijuana from Los Angeles during a particularly difficult time in his life and underwent a full-on birria conversion—on a religious scale. He returned to L.A. convinced that birria would be his salvation. He delivered food via Uber and Lyft in order to raise the capital for some kitchen equipment, and soon began selling beef-shoulder birria de res out of his car, developing a following on Facebook and Instagram in the process. Soon he’d upgraded to a food truck, and now Teddy’s Red Tacos is a mini-empire, consisting of half a dozen locations—most of them trucks, all of them hugely successful—spread out across Los Angeles. The influence of Teddy’s Red Tacos is much, much wider, however, because the operation is also an online sensation. The point is: Teddy Vasquez graduated from noviciate to high priest of birria in just five short years!

For us, one combo plate at Teddy’s was all it took. Actually, just one portion of one of Teddy’s combo plates was all it took: the quesabirria, or birria taco with cheese. The straight-up Teddy’s birria taco was already a work of art. The addition of cheese, which when dipped into the steaming container of consomé (spicy beef broth) that accompanied it (like in the photo above), became even gooier (impossibly so), even more decadent, was a masterpiece.

Anyway, at some point over the last year, with travel largely an impossibility, and nothing remotely like Teddy’s Red Tacos anywhere nearby, birria became a pandemic project around here. And it’s easy to get carried away. The range of recipes that are available in traditional resources like magazines and newspapers are already impressive. Explore Instagram and TikTok and the sources of inspiration grow exponentially.

Like all classic braises, birria is deeply satisfying to make. In fact, the aromas unleashed in our apartment each time I’ve made birria have been downright hallucinatory—the most intoxicating aromas I’ve created in the kitchen in recent memory. And not only are your best birria recipes highly addictive, but they tend to be extremely generous, and they freeze and keep well. Have a sudden hankering for a fully loaded, overstuffed birria burrito? No problem. Just grab one of those 250-ml containers of birria de res that you froze a few weeks ago, start your rice, and gently reheat it. Want to try your hand at birria ramen? or birria pizza? or birria tortellini? (This being an internet craze, the mash-ups are endless.) Same deal. You’ve already got the most important ingredient on hand.

Tejal Rao’s New York Times article “The Birria Boom Is Complicated, but Simply Delicious” from earlier this year, is a great overview of birria mania and its permutations. It also comes with a selection of tantalizing recipes, including an excellent one for birria de res from chef Josef Centeno of L.A.’s Bar Amá Although he trained in haute cuisine temples like Manresa in Los Gatos, CA, Centeno is originally from Texas, and his restaurant is a sophisticated ode to the Tex-Mex comfort food he grew up with. Birria is not a major part of his menu, but it is a staple, although it often appears in non-traditional forms, like the mushroom birria that is currently on offer. His classic birria de res at Amá, which he makes on a seasonal basis, when the temperatures are right, is based on how his grandmother made her version.

Though the present birria craze is a modern phenomenon, and is largely beef-centric, the dish and its roots go back centuries to pre-Columbian times, and involve a wide variety of meats, depending on the region of origin, much like barbacoa. As a matter of fact, both dishes are closely associated with the use of fire pits.

fig. f:  “Mexico’s original celebrity chef”

fig. f: “Mexico’s original celebrity chef”

Rao cites a recipe that was published in a book of regional Mexican dishes that were collected by Josefina Vélazquez de Léon—a woman Saveur named “Mexico’s original celebrity chef”—back in 1946. The recipe in question is Zacatecan and it calls for an entire sheep (!), which is then rubbed in chilies, herbs, and spices, allowed to marinate, and then placed in a (presumably large) pot, sealed tight with masa, and buried in a fire pit—not unlike barbacoa.

Where birria and barbacoa differ widely is how they’re served. In the case of birria, traditionally the dish was served in a bowl, swimming in a plentiful amount of heady consomé. Though purveyors of birria tacos and related dishes—quesabirrias, vampiros, mulitas, etc.—have gotten the lion’s share of the attention on Instagram and TikTok, this more traditional version of the dish—a stew served with corn tortillas and an assortment of simple accompaniments—remains a significant part of the “birria boom.” Rao’s article cites several places in Los Angeles alone that serve these types of birria, including Bar Amá.

And it’s this brothier, more traditional approach that we’ve been working on in the AEB test kitchen. The first recipe we tried was Centeno’s birria de res, as featured in The New York Times (and adapted by Rao). Even though Rao gives considerable attention to the birria tacos craze (as you’d expect), it’s Centeno’s version that serves as the lead image for her article.

fig. g:  birria de res and the “birria boom”

fig. g: birria de res and the “birria boom”

And in a rare instance of truth in advertising, Centeno’s recipe turns out exactly like this when you actually make it. We made our own corn tortillas, too, so the overall arrangement was very similar to what you see in the photo above.

This birria de res is really great, and a great place to start if you’ve never made this dish. The consomé is rich and seductive, the beef luscious. It’s everything you want in a beef stew—and more! This is a recipe that gives and gives and gives. The leftovers are heavenly, and it freezes very well. You’ll probably end up with more consomé than meat, but that’s a good thing. Trust me, it will come in very handy when it comes to dressing up a burrito, for instance.

A couple of months later, just before Easter, our local butcher, Aliments Viens, advertised that they’d gotten a nice shipment of Quebec lamb. I remembered a recipe I’d come across years ago in an issue of Bon Appétit that was originally created with goat in mind, but had been adapted for lamb (recalling Vélazquez de Léon’s recipe mentioned above). So I called Aliments Viens, and asked them to put a shoulder aside for me.

The recipe in question came courtesy of a birria specialist restaurant in Chicago, Birrieria Zaragoza, but it’s based on a version that has its origins in the Zaragoza family’s hometown, La Barca, in Mexico’s Jalisco state. It was one of the very first birria recipes to really catch my eye. I’d been meaning to make it for years. Suddenly I had all the inspiration I needed: I was in the midst of my own personal birria craze, I had access to fresh, locally raised lamb shoulder, and it was Easter. I couldn’t think of a better rendition of the paschal lamb—a spicy, blissed-out version that was both braised and roasted, and oh-so giving. Once again, the results were sensational—a true show-stopper.

fig. h:  braised lamb shoulder

fig. h: braised lamb shoulder

fig. i:  roasted lamb shoulder

fig. i: roasted lamb shoulder

fig. j:  all the fixings

fig. j: all the fixings

Braised Lamb Birria

4 ounces ancho chiles (about 10), seeds removed 1⁄2 cup raw peanuts

11⁄2 teaspoons cumin seeds

1 teaspoon black peppercorns

2 cloves garlic, peeled

1⁄2 teaspoon ground cinnamon

1⁄4 disk Abuelita Mexican chocolate or 11⁄2 ounces dark chocolate

2 tablespoons vegetable oil

5 pounds bone-in goat or lamb shoulder

Kosher salt

2 bay leaves

2 chiles de árbol, seeds removed

1⁄2 15-ounce can fire-roasted tomatoes

4 cups low-sodium chicken broth, preferably homemade

1⁄2 teaspoon dried oregano

Accompaniments: Chopped white onion, chopped cilantro, lime wedges, and warm corn tortillas (for serving)

Special equipment: a mortar and pestle or spice mill

Preheat your oven to 275° F. Bring ancho chiles and 4 cups water to a boil over medium-high. Remove from heat and let cool.

Meanwhile, toast peanuts on a rimmed baking sheet, tossing once, until golden brown, 15–20 minutes. Let cool.

Turn the oven down to 250º F.

Toast the cumin seeds and peppercorns in a dry small skillet, tossing occasionally, until very fragrant, about 2 minutes. Let them cool, then finely grind them together in a spice mill or with mortar and pestle, along with the cinnamon.

Purée the ancho chiles and soaking liquid, peanuts, spice mixture, garlic, and chocolate in a blender until smooth. Strain through a fine-mesh sieve into a Dutch oven or another large heavy pot, reserving any solids. Return the solids in a sieve to the blender and add 3 cups water. Process until smooth and strain back into Dutch oven; discard any solids.

Heat the oil in a large skillet over medium-high. Season meat generously with salt. Cook, turning occasionally, until browned all over, 12–15 minutes total. Carefully add meat to Dutch oven and add bay leaves. Bring liquid to a simmer over medium-high. As soon as it begins to bubble, lower the heat, cover the pan tightly with foil, then place lid on top. Place the Dutch oven in the oven and braise the meat until it shrinks off of bones and is fork-tender, 3–3 1⁄2 hours (check periodically to make sure liquid is at a gentle simmer).

Meanwhile, purée the chiles de árbol, tomatoes, broth, and oregano in a clean blender until smooth. Strain through a clean sieve into a large saucepan and bring to a simmer over medium heat; cook 10 minutes to let the flavours meld. Season with salt; keep this sauce warm.

Increase the temperature of the oven to 400°. Let the meat cool, uncovered, in braising liquid 30 minutes. Transfer meat to a rimmed baking sheet and roast until edges begin to brown, 13–17 minutes. Pull or slice meat into servings. Divide among shallow bowls along with tomato-chile sauce.

Serve meat with onion, cilantro, lime wedges, and tortillas alongside.

[Serves 8 generously, or makes some wonderful leftovers]

{Based very closely on a recipe from Jonathan Zaragoza of Birrieria Zaragoza in Chicago}

As you can see in the photo above, in addition to the onion, cilantro, and the lime wedges and tortillas (unpictured), I made some pico de gallo, some salsa verde, and some pickled serranos to complete the scene. Sour cream and Tapatio were also served, just in case needed someone needed even more layers of taste sensation. What you can’t see, is just how elegant this version is. The meat is deeply roasted, remarkably tender, and extraordinarily flavourful, and it’s served in a pool of thin, but incredibly tasty broth (the “tomato-chile sauce”). The tacos that result, if you’re so inclined, are outstanding. It was hard for me to imagine a better Easter meal. Birria for the win, once again!

For the moment at least, it’s birria’s world, and some of us are lucky enough to live in it.

aj

Gravlax Made Easier (and Brighter!)

 
fig. a:  three amigos

fig. a: three amigos

It started with the Three Amigos: lemon, lime, and orange.

I crave citrus all winter long. I always have, but in recent years it’s become an even more essential part of my winter survival kit. And during a pandemic winter, what we might call the urgency of citrus grew considerably. Since December, when we picked up our first case of Spanish clementines, we’ve been on one helluva citric kick.

Miraculously, we haven’t maxed out yet. This in spite of the fact that lemons, limes, and oranges have been in countless ways, both savoury and sweet, as well as in the form of juices and cordials. In fact, the range of citrusy things I’ve been craving seems to be expanding as the first hints of spring have arrived. With artichokes? Yes, please. On asparagus? Why, thank you very much. Gracing a green salad? Absolutely. Zested and sprinkled on fish? Might as well.

Which is how I came to make a recipe for Citrus-Cured Salmon (a.k.a., Citrusy Gravlax) that I’d noted and admired in an old issue of Bon Appétit. My need for yet another citrus fix kicked in one day recently, I started flipping through my mental Rolodex, and I suddenly remembered the image of a bright, citrusy, beautifully cured gravlax that I’d once seen. A little digging around ensued, and…

fig. b:  “…a bright, citrusy, beautifully cured gravlax that I’d once seen.”

fig. b: “…a bright, citrusy, beautifully cured gravlax that I’d once seen.”

It appeared in BA’s 2016 Travel Issue (page 140 of the May issue, to be exact) and it accompanied a piece about a remote restaurant (on stilts!) that sits on Ismailof Island in Alaska’s Halibut Cove called The Saltry. It’s a seasonal operation, only open from Memorial Day to September, and it appears to still be going strong. And one of the specialties of the house at the time was an unusual—and unusually tasty—citrusy gravlax.

It’s also unusually quick and easy to make. You might recall that I posted a recipe for gravlax back in December that claimed, “it’s as easy as they come.” Well, this one’s even easier. No joke. The cure-to-fish ratio is relatively high, which allows the curing process to be a little faster than usual—24-36 hours, as opposed to the 3-5 days that’s common with gravlax recipes.

The only real challenges here are tracking down a beautiful salmon fillet (preferably wild king—or, even better, organic wild king), gathering together a few spices, and making sure you’ve got those Three Amigos on hand.

The transformation is remarkable. Take a look!

fig. c:  before

fig. c: before

fig. d:  after

fig. d: after

And the finished product is both phenomenally beautiful, and incredibly delicious.

It’s remarkable what a little citrus zest can do. This gravlax sings with a citrus zing.

Citrus-Cured Salmon (a.k.a., Citrusy Gravlax)

5 oz kosher salt (1 cup Diamond Crystal or 1/2 cup Morton’s)

2/3 cup granulated sugar

1/3 cup (packed) light brown sugar

1 tsp black peppercorns

1 tsp coriander seeds

1 tsp fennel seeds

1/2 crushed red pepper flakes

1 x 1 lb skin-on, boneless salmon fillet, preferably wild king

1/2 tsp finely grated lemon zest

1/2 tsp finely grated lime zest

1/2 tsp finely grated orange zest

Grind the pepper, coriander seeds, fennel seeds, and pepper flakes in a spice mill, leaving them slightly coarse.

Then mix the salt, sugar, brown sugar, and the spice blend together in a bowl.  This is your curing mixture

Line a rimmed baking sheet with a large sheet of foil (it needs to be large enough to wrap around your salmon completely).  Spread half the curing mixture in the centre of the foil-lined baking sheet.  Place your 1 lb. salmon fillet, skin-side down, on top.  Scatter the zests over the fish; then cover the fish with the rest of the curing mixture, piling it up against the sides of the fish so they get cured too. 

Bring the foil up and over the salmon and crimp to create a sealed envelope.  Top with a 2-gallon zip-top bag filled with water, or some other kind of similarly weighty object, keeping in mind that you’ll have to find enough room in your refrigerator to place the ensemble.  Chill in the refrigerator for 24-36 hours, making sure to unwrap the fish, flip it skin-side up, and re-wrap it once during that span of time (preferably halfway through).  

When the fish is fully cured (after at least 24 hours), rinse it of most of the cure and pat dry, then place skin-side down on a cutting board.  Using your longest, sharpest knife cut on a diagonal 1/8-1/4” thick, leaving the skin behind, and wiping down the blade with a moist towel between slices if need be.

Serve with rye bread, or bagels, or blini, or matzah, or pile onto a citrusy salmon version of Eggs Benedict.  You get the picture. 

Whatever you do, take the time to enjoy this bright, beautiful ray of sunshine. We could all use a little more light.

aj

"Japanese Home Cooking" For a Year of Cooking at Home

Our good friend Joanna Fox has a timely rundown of great cookbooks from this past year in today’s Montreal Gazette, as contributed by a number of local Montreal chefs, food writers, and other tastemakers. Of course, this was a year when home cooking took on increased importance for so many people. Luckily, there were quite a number of new cookbooks that were released in 2020 to help inspire us, in addition to all the newspaper and magazines, the YouTube tutorials, the TikTok videos, the Instagram posts, and all the rest of our contemporary multi-platform culinary universe.

Joanna’s contributors include such luminaries as Meredith Erickson (Alpine Cooking: Recipes and Stories from Europe's Grand Mountaintops, Friuli Food and Wine: Frasca Cooking from Northern Italy's Mountains, the Joe Beef cookbooks, and others), Janice Tiefenbach (Elena), and Jonathan Cheung (Appetite for Books), as well as our very own Michelle (!).

If you’ve had any contact with Michelle over the last 8-9 months, her choice should come as no surprise. She first picked this book up from our local library late in the winter of 2020, and when the pandemic hit and the library was closed for weeks on end, the book was stuck with us for an indefinite length of time. We all got to know each other pretty well! And when the library reopened again, and they asked for all their books back, Michelle promptly made a point of returning this book to the library (what did you think?) and picking up her very own copy. Since then, she’s continued to cook from it with passion and abandon, and she’s talked about it at length with anyone who’ll listen, including Joanna, apparently. That book, of course, is Sonoko Sakai’s Japanese Home Cooking: Simple Meals, Authentic Flavors.

japanese home cooking.jpeg

Here’s what Michelle had to say about the book in her own words:

This is hands-down the book I have used the most in the past year. It hits the right tone of home cooking without shying away from more technical projects for those looking for a challenge. Every single thing I have made from this book has turned out perfectly. When I suddenly had reams of time, but no ability to focus, I threw myself into hand-making soba noodles. Her method and recipe are spot-on — all you need is practice to get the thickness and cutting right. (Check out her soba noodle-making webinars.) Bonus: the book features a recipe for rustic buckwheat dumplings (sobagaki), which are much easier to make than soba noodles and give you the same great taste when you use fresh sobakoh flour.

And here are some shots of Michelle making Sakai’s soba noodles for the first time, back in late March:

soba 1.jpeg
soba 2.jpeg
soba 3.jpeg

If you’re curious about the method, here it is in Michelle’s own words:


I had ordered specially milled buckwheat flour to make soba noodles before the madness began. My cutting leaves a lot to be desired but believe me when I say that this flour has a texture and flavour absolutely unparalleled by anything I have ever had. In case your self-isolation needs soba noodles, here is the recipe:

200g soba flour
50g all-purpose flour
120g water, more or less
Sift the flours together in a large bowl, add water and mix until dough starts to come together. Add a bit of water if necessary and knead until smooth. Lightly flour your work surface with tapioca starch and roll dough out to 1/8” thick. Sprinkle with more starch, fold, and cut into thin noodles. Not as easy as it sounds!

Boil in salted water about 1-2 minutes and rinse noodles with cold water. Serve.

[The soba flour in question came from Soba Canada, Inc. If you live in the United States, another phenomenal option is the “ni-hachi sobakoh” from Anson Mills.]

So, has Sonoko Sakai largely been responsible for eight or ninth months of particularly inspired Japanese home cooking? You tell me.

Long live the cookbook! Long live home cooking, Japanese and otherwise! Thank you for a great year, Sonoko!

And it should go without saying, but, if at all possible, please support your local bookstores in this period of economic crisis, stores like Appetite for Books, Drawn & Quarterly, and others.

aj

What We Need Now 2: Plum Cake


This is an elegant, truly delicious, and unbelievably simple recipe for a “pantry cake” (a fruit-based, crispy/tender slab cake that doesn’t require any obscure ingredients) that Michelle devised for our friends at Elena and the Remember Skin Contact? cookbook they created this spring as a fundraiser for the Montreal Restaurant Workers Relief Fund after the shutdown went into effect. (Great people! Great cause!)

Imagine a luscious, plum-laden European coffee cake, and you kind of get the gist of this cake and the vision behind it.

fig. a: no imagination necessary—here it is!

Imagine a cake that’s incredibly easy to make and knocks it out of the park every time.

Michelle had berries in mind when she first invented the recipe, because it was April, berries were due to begin arriving on the scene by June and early July, and the thought of making this cake with blueberries or blackberries seemed like a natural. But she wanted a recipe that would accommodate other fruit options as well, and one of the variations that she was most interested in trying was with plums. Why plums? Well, we love plums, we love plum desserts and plum dishes, and we often find ourselves dreaming of plums—sugar plums, and otherwise. I mean, we did name our preserves line Švestka, after all.

fig. b:  early branding

fig. b: early branding

What we didn’t know at the time was that while 2020 has been an absolutely lousy year for virtually everything, it turned into a pretty good plum year. We have an old plum tree that had never really produced in the time we’d known it, but that exploded with fruit this summer.

fig. c: bumper crop

And plums at the farm stands, farmers’ markets, and co-ops have been tasty and plentiful. In fact, this latest batch of the plum cake was inspired by these lovely, Italian-style Valor plums that we came across on the weekend. So tiny! So sweet! Plus, they look a lot like the Švestka plum!

fig. d:  Valor is my name

fig. d: Valor is my name

So, if Italian plums are in season or available where you live, they’d be perfect for this recipe.

But the genius of this recipe is that it will definitely work like a charm with berries of all kinds, and it could just as easily become a cherry or pear cake (and around here, it has). And if you don’t have any kirsch on hand, you could also use other liquors, like rum or bourbon, depending on the fruit. In other words, it’s an incredibly versatile recipe. Stick to the original “luscious, ____-laden European coffee cake” vision behind the recipe, and you should be in good stead.

We highly, highly recommend the original plum version, though. We’re a little partial, of course, but we both think it’s kind of perfect, and I’m quite sure it’s my favourite variation.

fig. e: Plum Cake, by the slice

Michelle’s Simply Beautiful Plum Cake

batter:

1/2 cup A.P. flour

1/2 cup semolina flour

1 tsp baking powder

1 generous pinch salt

2 eggs

3/4 cup sugar 

1 tbsp sour cream

1 tbsp (or more!) kirsch

1/2 cup butter, melted

toppings:

a pint of fresh plums, pitted and halved (both tart and sweet varieties can be used—just adjust accordingly [see below])

a handful of sliced almonds

1 tablespoon sugar (a little more if your plums are extra tart)

Preheat oven to 350º F.

Butter 8” x 8” square cake pan.  Lay a piece of parchment paper inside that’s large enough to cover the bottom and the sides of the pan.  Butter the parchment paper, too.

Mix dry ingredients in a bowl.

Whisk eggs with sugar until mixture lightens in colour and becomes creamy.  Whisk in sour cream until fully blended.  Whisk in kirsch until fully incorporated.  Whisk in melted butter until mixture is homogeneous.  This whole process should take no more than about 3 minutes. 

Add dry ingredients, and whisk once more until just smooth.

Pour batter into parchment-lined cake pan.

Place plums, cut-side down, over the surface of the batter.  Sprinkle sliced almonds over top.  Sprinkle 1 tablespoon of sugar over top almonds and plums.

Place in the oven on the middle rack.

Bake for 30-35 minutes, until a toothpick inserted into the middle of the cake comes out clean.

Place on a cooling rack and allow to cool.

Cut into squares, serve, and enjoy.  This cake is perfect on its own with a cup of coffee or tea, or an after-dinner drink.  But it’s also excellent with vanilla ice cream, or freshly whipped cream.

It’s simple. It’s beautiful. It’s also delicious. What are you waiting for?

aj

What We Need Now 1: Pan Pizza

 
fig. a: The Joy of Pan Pizza

fig. a: The Joy of Pan Pizza

I’m definitely not the first person to point this out, but what we need now are simple, satisfying recipes; recipes that don’t require a bunch of obscure ingredients, but instead feature items that can be easily found at your local supermarket, green grocer, or co-op; recipes that actually turn out well (exceptionally well) and that are rewarding to make.

And if these recipes should have a touch of nostalgia to them, all the better.  

Enter pan pizza.

So much of the literature on pan pizza—and, believe me, there is a fairly extensive body of literature on the topic—is dripping with nostalgia.  Almost literally so.  There’s a real obsession with trying to recreate those buttery, decadent crusts of yore, topped with excessive amounts of gooey cheese, and lots of piping-hot, slightly sweet tomato sauce—the ones that you cherished as a child.  The ones you may still cherish today.

While my family definitely ate a considerable amount of pizza, I didn’t grow up in a pan pizza household.  I never had that powerful association with Pizza Hut and its ilk that so many others had.  I wasn’t entirely averse to the pan pizza thing—its charms were pretty obvious to me—but, for better or for worse, other types of pizza exerted a stronger influence on me.

All of which is to say, that when I got interested in making pizza at home a number of years ago, I gravitated toward other styles:  mainly Neapolitan (or rather, Neapolitan-esque), New York-style (or what might more accurately be described as New York-ish), some approximation of Bay Area pizzas we’d admired in the past, and sheet pizzas that mimicked those of Sullivan Street Bakery.  Even though I often read about pan pizza with interest, it took me years to actually get around to trying one of these new-school, homemade pan pizza recipes out.

Big mistake.

When I began to experiment with pan pizza a couple of years ago I quickly realized that these were among the very easiest, most consistently excellent, and most satisfying home pizza recipes out there.  They didn’t require ingredients that were difficult to find, and you didn’t need a pizzaiolo’s touch or a whole lot of fancy equipment.  Hell, you didn’t even need a pizza peel (or some kind of substitute for one), you just needed a 10-inch skillet, preferably cast-iron.

fig. b:  Look, Ma, no peel!

fig. b: Look, Ma, no peel!

My go-to pan pizza recipe is actually a mash-up of two popular recipes that have appeared online in recent years:  one from Serious Eats, and the other from The New York Times Magazine.

The dough recipe comes from J. Kenji López-Alt, it’s incredibly easy to make, and, even better, it’s foolproof—or as close to foolproof as a recipe can be. In fact, that’s what it’s called: Foolproof Pan Pizza Recipe.  The only investment needed is time.  I typically start the process late at night, before I go to bed.  This step takes mere minutes.  The next morning I form my dough balls.  Again, this step takes no more than 10-15 minutes (tops!).  And by late afternoon/early evening, my pizza dough is ready to go—the only thing is that you need to allow 2 hours for your dough to temper and come to room temperature.  Once your dough has tempered, you’ll find it incredibly easy to handle and stretch.  You’ll also find it very much alive.  Twenty to twenty-five minutes later, you’ll be pulling piping-hot pan pizza from the oven—quite likely, the lightest, tastiest pan pizza you’ve ever tasted.  Sounds do-able, right?

Kenji’s accompanying sauce recipe is perfectly excellent.  But even better, in my opinion, is a sweeter, somewhat more decadent sauce developed by Anthony Falco of Roberta’s.  It, too, is foolproof—or as close to it as imaginable—and its Bit-o-Honey finish is the ultimate flavour sensation with these crispy, chewy, buttery, and wonderfully gooey pies.

J. Kenji López-Alt’s Seriously Foolproof Pan Pizza

400g bread flour, plus more for dusting

10g kosher salt, plus more for sprinkling

4g instant yeast

275g water

8g extra-virgin olive oil, plus more to coat pans and for drizzling

1 1/2 cups pizza sauce (such as Anthony Falco’s Pan Pizza Sauce [see below])

12 ounces grated full-fat, low moisture (dry) mozzarella cheese

2 ounces grated Parmesan or Pecorino Romano cheese

1.  Make the pizza dough, keeping in mind that this is a slow-ferment dough that requires over 12 hours to be made properly, and that will benefit from even more time.  (My normal schedule has been to mix the dough late at night before I go to bed.  Form the pizza doughs the next morning.  Wrap them and place them in the fridge to hold all day.  Then remove from the fridge two hours before baking so they can temper at room temperature [see details below].)

2.  Combine flour, salt, yeast, water, and oil in a large bowl. Mix with hands or a wooden spoon until no dry flour remains. (The bowl should be at least 4 to 6 times the volume of the dough to account for rising.

3.  Cover bowl tightly with plastic wrap, making sure that the edges are well sealed, then let rest at cool room temperature (no warmer than 75°F) for at least 8 hours and up to 24. Dough should rise dramatically and fill bowl. In a hot kitchen, the dough may overproof near the end of that range.

4.  Sprinkle top of dough lightly with flour, then transfer it to a well-floured work surface. Divide dough into 2 pieces and form each into a ball by holding it with well-floured hands and tucking the dough underneath itself, rotating it until it forms a tight ball with a smooth surface.

5.  If you’re aiming to bake some pies in about 2 hours, skip the next step and move on to Step #7.

6.  If you still need some time, place the doughs on a well-floured small rimmed baking tray, cover with plastic wrap, and place in the fridge for several hours (up to 36).

7.  Pour 2 tablespoons oil in the bottom of two 10-inch cast iron skillets. Place 1 dough ball in each pan and turn to coat evenly with oil. Using a flat palm, press dough around the pan, flattening it slightly and spreading oil around the entire bottom and edges of the pan. Cover tightly with plastic wrap and let dough sit at room temperature for 2 hours (at room temperatures above 75°F, the dough may require less time to rise; at temperatures below 65°F/18°C, it may require more time). After the first hour, adjust an oven rack to the middle position and preheat oven to 550°F (290°C).

8.  After 2 hours, dough should be mostly filling the pan up to the edges. Use your fingertips to press it around until it fills in every corner, popping any large bubbles that appear. Lift up one edge of the dough to let any air bubbles underneath escape, then repeat, moving around the dough until there are no air bubbles left underneath and the dough is evenly spread around the pan.

9.  Top each round of dough with 3/4 cup sauce, spreading sauce to the very edge with the back of a spoon. Sprinkle evenly with mozzarella cheese, all the way to the edges. Season with salt. Drizzle with olive oil.

10.  Transfer pan to oven and bake until top is golden brown and bubbly and bottom is golden brown and crisp when you lift it with a thin spatula, 12 to 15 minutes. Immediately sprinkle with grated Parmesan or Pecorino Romano cheese, if using. Using a thin spatula, loosen pizza and peek underneath. If bottom is not as crisp as desired, place pan over a burner on your stove and cook on medium heat, moving the pan around to cook evenly until it is crisp, 1 to 3 minutes. Remove the pizzas and transfer to a cutting board. Cut each pizza into 6 slices and serve immediately.

Now that we’ve learned to make the dough and bake the pizza, it’s time to hit the sauce.

Anthony Falco’s Pan Pizza Sauce

2 tablespoons olive oil

1 clove garlic, peeled and minced

2 tablespoons tomato paste

Pinch of chile flakes, to taste

1 x 28-ounce can whole San Marzano tomatoes, crushed by hand

2 tablespoons honey

1 teaspoon kosher salt, or to taste

Place a saucepan over medium-low heat, and add to it 2 tablespoons olive oil. When the oil is shimmering, add the minced garlic and cook, stirring, until it is golden and aromatic, approximately 2 to 3 minutes.

Add the tomato paste and a pinch of chile flakes, and raise the heat to medium. Cook, stirring often, until the mixture is glossy and just beginning to caramelize.

Add the tomatoes, bring to a boil, then lower heat and allow to simmer for 30 minutes, stirring occasionally.

Take sauce off the heat, and stir in the honey and salt, to taste, then blend in an immersion blender or allow to cool and use a regular blender.

Use as directed.

Okay, now that we’ve covered the basics, feel free to get creative. 

Personally, I like my pan pizza pretty simple and basic:  dough + sauce + cheese, with maybe some chili flakes, or some hot sauce, or some hot honey added at the last second, just before I’m about to chomp my still-blistering-hot slice. 

Pepperoni is considered by many to be a classic variation, especially by contemporary hot honey enthusiasts, but I never make it at home. 

What I will highly recommend is a version that’s still very much possible RIGHT NOW, while you can still find choice local cherry tomatoes around. 

fig. c:  How ‘bout them tomatoes?

fig. c: How ‘bout them tomatoes?

It’s super simple.  It just involves adding cherry tomato slices to a basic tomato-cheese pie, but if you source the right tomatoes, and you’re the kind of tomato fanatic that I am, they will take your pan pizza into the stratosphere.  Plus, it’s got a cute name.

fig. d:  What more do you need?

fig. d: What more do you need?

A.J.’s Tomayto-Tomahto Pan Pizza

Additional topping:

4-5 fresh, locally grown, organic cherry tomatoes (the sweetest, tastiest ones you can find) [per pie], sliced

Revised instructions:  

Follow instructions 1-9 to a T.  At that point follow these steps:

10.  Transfer pan to oven and bake until top is golden brown and bubbly and bottom is golden brown and crisp when you lift it with a thin spatula, 12 minutes. Remove from oven.  Distribute cherry tomato rounds evenly, pressing them gently into the molten cheese, while being careful not to press too hard, thereby scalding yourself.  Sprinkle with grated Parmesan or Pecorino Romano cheese. Return to oven and bake for another 2-3 minutes, until tomatoes are golden-brown and Parmesan or Pecorino is also bubbling wildly.  Using a thin spatula, loosen pizza and peek underneath. If bottom is not as crisp as desired, place pan over a burner and cook on medium heat, moving the pan around to cook evenly until it is crisp, 1 to 3 minutes. Remove the pizzas and transfer to a cutting board. Cut each pizza into 6 slices and serve immediately, keeping in mind that this pizza is a hot, molten, delicious, but dangerous mess at the moment.  Be careful.  Proceed with great anticipation, and an ounce of caution.

You’re all set.  

What more do you need?

aj